Be advised that these security updates are Cumulative Update level specific. You cannot apply the update for Exchange 2016 CU17 to Exchange 2016 CU16. Also, the security update download has the same name for different Cumulative Updates, and I would suggest tagging the file name with the CU level, e.g. Exchange2019-CU6-KB4588741-x64-en.msp.
Also, run the Security Update from an elevated command prompt, to prevent issues during installation. And on a final note, as with any patch or update, I’d recommend to apply this in a acceptance environment first, prior to implementing it in production.
A quick blog on security updates for Exchange Server 2016 and Exchange Server 2019 released September 8th. These fixes address the following vulnerability:
CVE-2020-16875: Exchange Memory Corruption Vulnerability A remote code execution vulnerability exists in Microsoft Exchange server due to improper validation of cmdlet arguments. An attacker who successfully exploited the vulnerability could run arbitrary code in the context of the System user. Exploitation of the vulnerability requires an authenticated user in a certain Exchange role to be compromised. The security update addresses the vulnerability by correcting how Microsoft Exchange handles cmdlet arguments.
The exploits can be fixed by single security update, which you can find in the table below per current Exchange version.
Be advised that these security updates are Cumulative Update level specific. You cannot apply the update for Exchange 2016 CU17 to Exchange 2016 CU16. Also, the security update download has the same name for different Cumulative Updates, and I would suggest tagging the file name with the CU level, e.g. Exchange2016-CU17-KB4577352-x64-en.msp.
Also, run the Security Update from an elevated command prompt, to prevent issues during installation. And on a final note, as with any patch or update, I’d recommend to apply this in a acceptance environment first, prior to implementing it in production.
Update 22feb2021: Added note about enabling SMTP Authentication.
Not too long ago, the Exchange product group enabled Modern Authentication (or OAuth2) support for IMAP and SMTP in Exchange Online, and shortly after for POP3 as well. This support was much needed with the imminent deactivation of Basic Authentication. With Modern Authentication available, vendors, developers as well as organizations running custom scripts are given time to adopt Modern Authentication where applicable.
By delaying the original end date of Basic Authentication from October 13, 2020 to Q3’ish 2021 due to the Corona situation, the adoption period is increased significantly. That does not mean however developers and organizations can sit back and relax: Act sooner rather than later, the end of Basic Authentication is nigh.
The benefits of Modern Authentication are of course that it is a more secure model (e.g. resistant to password spray attacks), as well that it can leverage Microsoft 365 functionality like Conditional Access to limit protocols to certain locations.
That said, in this article I will show you how to approve usage of a popular 3rd party e-mail application Thunderbird, using IMAP protocol in conjunction with the Modern Authentication scheme. The procedures below have been run against Thunderbird 78.0b4 on Windows as well as Ubuntu.
Third Party Applications Before we move on to Thunderbird, we first make sure the organization settings allow for third party applications to access your mailbox Exchange Online. This process has been blogged about for common popular applications, such as the native iOS Mail app or the Gmail app on Android. So, how to go ahead if your organization restricts access to third party applications, and they only want to allow specific applications, which is of course good practice.
The easiest way to add Thunderbird to the allowed applications and grant consent to the organization, is by constructing an admin consent URL. To construct the consent URL, take the following URL:
Replace <TenantID> with your Tenant ID. This piece of information can be found under the Azure Active Directory blade in the Azure portal.
Replace <AppID> with the Application ID (sometimes also referred to as Client ID) of the application you want to provide consent for. As we can see in the table below, the ID of Thunderbird is 08162f7c-0fd2-4200-a84a-f25a4db0b584.
Application
ID
Thunderbird
08162f7c-0fd2-4200-a84a-f25a4db0b584
Gmail app
2cee05de-2b8f-45a2-8289-2a06ca32c4c8
iOS Accounts (Apple Mail app)
f8d98a96-0999-43f5-8af3-69971c7bb423
Open your browser, and visit this URL as an administrator. You will be greeted with a consent form, in which you will be asked to accept for your organization. Because the redirect_uri is empty here, you will likely be send to a non-existing location after giving consent, but that’s OK.
When you look at the Enterprise Applications blade in the Azure Portal, you will notice the Thunderbird app has been added. Here you can further customize it, like any enterprise application supporting Modern Authentication, e.g.
Restrict access to specific users or groups.
Use Conditional Access to restrict access to certain locations.
Another thing to note is that permissions for Thunderbird app will have been translated to the following Graph permissions:
API
Permission
Type
Microsoft Graph
Read and write access to mailboxes via IMAP.
Delegated
Microsoft Graph
Read and write access to mailboxes via POP.
Delegated
Microsoft Graph
Read and write access to mailboxes via SMTP AUTH.
Delegated
Microsoft Graph
Sign in and read user profile.
Delegated
We should now be ready on the back-end.
Thunderbird Now as an end user, start Thunderbird. Do not start configuring the account yet, as we first need to modify a Thunderbird setting to allow for successful Modern Authentication through a browser popup. Click the ‘hamburger’ menu to open the Options window. Scroll all the way down, and open the Config Editor. Click ‘I Accept the risk’. In the settings overview, set General.UserAgent.CompatMode.Firefox setting to True:
Preference Name
Status
Type
Value
general.useragent.compatMode.firefox
modified
boolean
True
Close the Config Editor and Preferences tab. We can now set up our account in Thunderbird.
Select Add Mail Account, and enter your name and e-mail address. You can leave the password empty, as we will be using an Oauth token which we will retrieve later on. Press Continue to have Thunderbird figure out where your mailbox is hosted. When it properly discovers the mailbox location, it will set the configuration as follows:
If Thunderbird can’t figure out your settings (for some reason the Windows build could, but the Ubuntu build couldn’t), configure them as indicated above. We can’t select OAuth2 for authentication here, so leave Authentication as is; we will correct this right after we click Done.
Note: Configure manually would be the place you expect to set authentication to OAuth2 straight away, but with the build we used, the OAuth2 option is not available from the manual account setup dialog. Therefore, we need to set up the account and correct settings afterwards.
In the Server Settings window related to your account, select OAuth2 authentication:
In the Outgoing Server (SMTP) settings, select Offic365 (Microsoft) – smtp.office365.com, click Edit and set authentication for outbound SMTP to OAuth2 as well. Note: The Thunderbird build running on Ubuntu doesn’t provide the OAuth2 authentication option for SMTP.
When finished, click ‘Get Messages’. The familiar Microsoft 365 authentication browser dialog should show up. After signing in, the next question will be to grant consent to the Thunderbird application to it can access your mailbox data and send e-mail:
Note that this dialog can not be suppressed, as currently only interactive applications are supported. If you are working on an app or script which needs unattended access, please use Graph API.
After the user provides consent, Thunderbird is ready and will start fetching your default folders and mail items. If you want to view additional folders, you need to subscribe to them by right-clicking the account and picking Subscribe. Only folders with mail-items are supported, despite you can select every folder in your mailbox including Calendar or Contacts.
Note: If you encounter problems sending messages, please check the CASMailbox setting SmtpClientAuthenticationDisabled. If it is set to $true, you need to disable it to enable SMTP authentication, e.g.
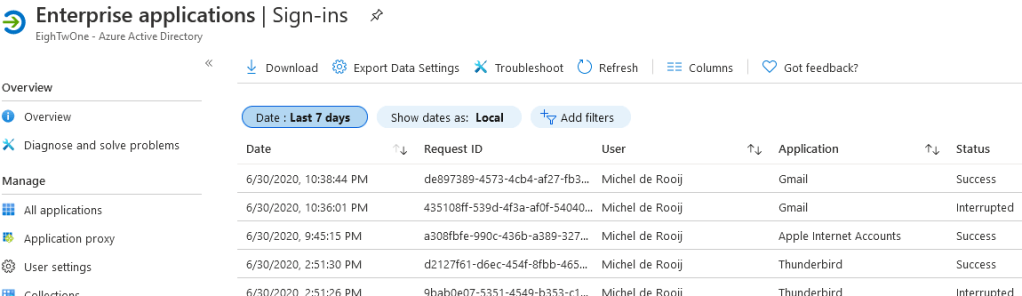
Logging If you have people in your organization requiring some form of proof that Modern Authentication is being used, you can use the Enterprise Applications / Sign-Ins view from the Azure Active Directory portal.
Alternatively, you can use Thunderbird’s built-in logging capabilities. To accomplish the latter, set the following environment variables before starting Thunderbird:
A quick blog on recently published security updates for Exchange Server 2013 up to Exchange Server 2019 and Exchange Server 2010 as well. These fixes address the following vulnerabilities:
CVE-2020-0692: Microsoft Exchange Server Elevation of Privilege Vulnerability
An elevation of privilege vulnerability exists in Microsoft Exchange Server. An attacker who successfully exploited this vulnerability could gain the same rights as any other user of the Exchange server. This could allow the attacker to perform activities such as accessing the mailboxes of other users. Exploitation of this vulnerability requires Exchange Web Services (EWS) to be enabled and in use in an affected environment. To exploit the vulnerability, an attacker would need to change parameters in the Security Access Token and forward it to a Microsoft Exchange Server, thereby allowing impersonation of another Exchange user. To address this vulnerability, Microsoft has changed the way EWS handles these tokens. This vulnerability does not apply to Exchange 2010.
CVE-2020-0688: Microsoft Exchange Memory Corruption Vulnerability
A remote code execution vulnerability exists in Microsoft Exchange Server when the server fails to properly create unique keys at install time. Knowledge of a the validation key allows an authenticated user with a mailbox to pass arbitrary objects to be deserialized by the web application, which runs as SYSTEM. The security update addresses the vulnerability by correcting how Microsoft Exchange creates the keys during install.
The CVE documents contain more details on the vulnerabilities. In addition, KB4536989 (Rollup 30) for Exchange 2010 and KB4536988 for Exchange 2013 also fixes the following issue:
KB4540267 MSExchangeDelivery.exe or EdgeTransport.exe crashes in Exchange Server 2013 and Exchange Server 2010
The exploits can be fixed by single security update, which you can find in the table below per current Exchange version.
Be advised that the Security Updates for Exchange 2013-2019 are Cumulative Update level specific. Unfortunately, the security update carries the same name for different CUs, and you cannot apply the update for Exchange 2016 CU15 to Exchange 2016 CU14. I would suggest tagging the Cumulative Update in the file name used, e.g. Exchange2016-CU15-KB4536987-x64-en.msp.
Also, run the Security Update from an elevated command prompt, to prevent issues during installation. And on a final note, as with any patch or update, I’d recommend to apply this in a acceptance environment first, prior to implementing it in production.


![clip_image001[14]](https://eightwone.com/wp-content/uploads/2020/07/clip_image00114.png "clip_image001[14]")

![clip_image001[18]](https://eightwone.com/wp-content/uploads/2020/07/clip_image00118.png "clip_image001[18]")