

Last Update: Added points from Exchange Online Transport – Manage Email, Optics, End User Experiences.
It shouldn’t come as a surprise that this year’s Ignite event is very different than previous years. However what is also different is that at this year’s digital experience, product groups lined up articles and pre-recorded sessions with deep-dive level 300-400 contents as well as articles to accompany those. The sessions, which are available through the Virtual Hub, were all launched right after the start of the event, including the prepared articles. Speaking of a flood flood of contents to digest.
To ease digesting all this information related to Exchange without going through all the videos and blogs, I prepared a summary of all the announcements made at and during Ignite for your reference. For reference, links to the original articles and sessions are at the bottom of this article. The list might not be conclusive; if you find something missing, let me know.
Exchange vNext
- Exchange Server vNext is scheduled for H2/2021, and will be subscription-based.
- Will support in-place upgrades from Exchange Server 2019, just like installing another Cumulative Update. Which makes you think, maybe it is just a CU with a high version offset to avoid clashing with its predecessor.
- Support for this in-place upgrade process is limited to 2 years after release of vNext. If everything goes to plan, this means upgrades will be supported from Exchange 2019 CU11/12-CU19/20 to Exchange vNext RTM-CU8/9.
- Will support co-existence with Exchange Server 2013, 2016 and 2019, which is 1 down-level more than previous editions (n-3 support instead of n-2).
- Customers staying on-premises are recommended to upgrade to Exchange Server 2019 today, so they can benefit from an in-place upgrade to vNext when it gets released.

Exchange Online
- Exchange Online Management PowerShell module is now GA (v2.0.3). This module contains cmdlets leveraging Graph which can show significant performance enhancements in larger tenants, supports certificate-based authentication a.o.
- Exchange Online Management PowerShell preview module (v2.0.4) supports Linux and PowerShell Core.
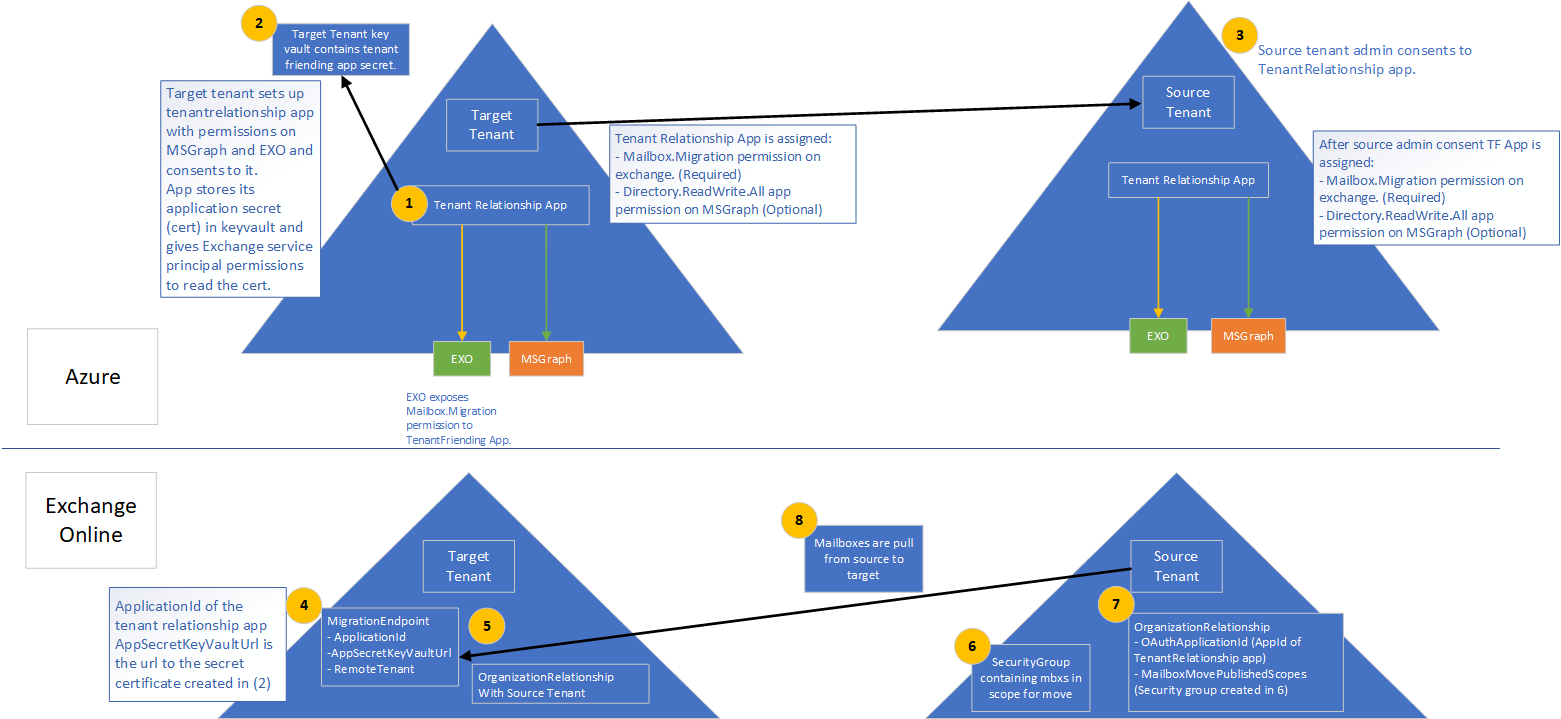
- Cross-tenant migration of mailboxes is now in Public Preview. Separate programs for cross-tenant SharePoint Online and OneDrive for Business will also launched (register for private preview at aka.ms/SPOMnAPreview). An Azure Key Vault subscription is required on the target tenant. Management of these moves is done from PowerShell, after setting things up with some MSFT scripts which you can grab from GitHub here.
- SMTP domain sharing as well as cross-tenant People Search are in private preview. More information on this in Supporting Mergers, Acquisitions, and Divestitures in Microsoft 365. You can register for them at https://aka.ms/domainsharingpreview and https://aka.ms/crosstenantpeoplepreview respectively.
- The long-awaited plus-addressing is now available worldwide. To enable, use
Set-OrganizationConfig -AllowPlusAddressInRecipients $true
- Message Recall to orchestrate recall of message in Exchange Online as announced at Ignite 2019 is expected later this year (Q4/2020).
- Admins can toggle the new Exchange Admin Center (was already in preview). It will become the default in Q1/2021.
- The new Exchange Admin Center is also tailored for use on mobile browsers.
- Outbound mail flow now supports MTA-STS (MTA Strict Transport Security).
- The new Exchange Admin Center will host all mail flow related management options, which will be consolidated from the earlier Admin Center as well as the Security & Compliance Center.
- The new Exchange Admin Center will get new mail flow insights and notifications, such as early certificate expiration notifications or detected reply-to-all storms.
- Option to reduce message expiration timeout interval from the current default of 24 hours.
- Administrators get the option to block users from moving groups (distribution groups as well as Microsoft 365 Groups) to the BCC line, which might break receivers’ inbox rules (Q1/2021).
- Entitled organizations can appoint Priority Users. Priority Users are critical mailboxes that are monitored for mail flow issues. Requires minimum of 10,000 Office 365 E3 or E5 or Microsoft 365 E3 or E5 licenses with at least 50 monthly active Exchange Online users.
- Microsoft 365 Network Connectivity functionality goes into preview, which is accessible via the admin portal (Health > Network Connectivity).
- The stand-alone Network Connectivity test tool also goes in preview, and is available from connectivity.office.com.
- Notifications for expired or soon to expire SSL certificates and Domains (Q4/2020).
- Customizable message expiration (8-24hours, Q4/2020).
- Reply-to-All storm protection v2 with customizable thresholds and reports (Q4/2020-H1/2021).
- Client-agnostic improved Message Recall (Q4/2020).
Exchange 2019
- Exchange Server 2019 Server Role Requirements Calculator or just Capacity Calculator is now available as separate download (v10.5, link).
Exchange Hybrid
- New Exchange Hybrid Configuration Wizard, which will become available later month, will support connecting your Exchange on-premises environment to multiple tenants. Note that multiple Exchange organizations connecting to a single tenant was already an option, as mentioned in the supported Azure AD Connect topologies document (link).

- Multitenancy Exchange Hybrid will support up to 5 tenants.
- Setting multitenancy up requires Exchange Server 2019 CU7 or Exchange Server 2016 CU18 or later.
- Multitenancy does not enable SMTP domain sharing, which is logical as you can only setup domain once in Office 365.
- Exchange Hybrid Modern Authentication (HMA) can only be configured with one single tenant.
Outlook Desktop/Mac
- Office will get perpetual release (Windows & Mac) in H2/2021.
- Attendees who left company get removed from meeting after first NDR.
Outlook Mobile
- Play My Emails coming to Canada, Australia, India and the United Kingdom (Outlook for iOS and Android).
- Option to ask Cortana to read out emails from specific people, time frame and topics in (Outlook for iOS, September).
- Voice commands for email composition, calling and scheduling (October).
- Sync contact folders with your phone by category (October).
- Reactions to emails with emojis without filling your inbox (Q4)
- QR connect to simplify work account setup (October).
- Outlook for Mac will start using Microsoft Sync technology for enhanced performance and reliability.
- Widget support for iOS14 across apps.
- Option to toggle new Outlook for Mac via in-app switch.
References to official sources
- Exchange News and Announcements – Microsoft Ignite 2020 Edition
- Exchange Online Cross-tenant mailbox migration in now in Public Preview
- September 2020 Hybrid Configuration Wizard Update
- Exchange Online Transport News from Microsoft Ignite 2020
- Exchange Online Admin News at Microsoft Ignite 2020
- Setting Up for Success With Exchange Online – A Video Series
- Mailbox Protection with Microsoft 365 – The Video Series
- Exchange – Here, There and Everywhere (session)
- What’s at the heart of Outlook for iOS and Android? (video series)
- SIDETRACKED: Microsoft 365 admins and IT Pros at Ignite (session)
- Supporting Mergers, Acquisitions, and Divestitures in Microsoft 365
- Priority Accounts in Microsoft 365
- Network connectivity in the Microsoft 365 Admin Center Preview
- What’s New in Microsoft Teams – Ignite Edition
- What’s new in Azure Active Directory at Microsoft Ignite 2020
- Ignite 2020 – Book of News


