Exchange Online Management using EXOv2 module

Exchange2019Logo

Update (3sep2022) Updated reflect Azure AD app roles.

Early June, Microsoft released a new PowerShell module
for managing Exchange Online. This module got announced at Ignite 2019 already, but it took
few months between going into preview end of last year before it finally reached Generally Available status. Usage of this module offers substantial improvements over the existing methods to connect to Exchange Online using Powershell, such as:

  • Leveraging the PowerShell module ecosystem to install and update the module. This as opposed to the click-to-run Microsoft Exchange Online Powershell Module or connecting through PowerShell remoting.
  • Support for Multi-Factor Authentication. This is something which the click-to-run module also offers but is not available when using PowerShell remoting.
  • Robustness. Existing sessions could easily timeout when you took a short break from the console. Or worse, your script could terminate in the middle of execution. This required you to reconnect or forced you to add resilience to your scripts by handling with these disconnects from the back end. The cmdlets of the EXOv2 module should be more robust and resilient.
  • Introduction of the Graph API support, which should show improvements in terms of speed. Microsoft indicated an 4-8 times improvement should be achievable, but your mileage may vary depending on the operation.
  • Support for PowerShell 6/7, core, and non-Windows operating systems is coming.

Exchange Online Management v2 module

The module has been baptized EXOv2 to indicate a major change compared to the click-to-run module (hereafter referred to as EXOv1), and also because it uses Graph API, just like the AzureAD v2 module. The module is available in the PowerShell Gallery, and installation is straightforward. Open a PowerShell 5.1 or later session in elevated mode and run:

Install-Module ExchangeOnlineManagement

The EXOv2 cmdlets which are REST-based and and leverage Graph API have their nouns prefixed with ‘EXO’, e.g. Get-EXOMailbox. Currently, there are 9 EXO cmdlets in the GA module, as well as few additional ones (more on those later). The regular commands such get Get-Mailbox are available as well after connecting to Exchange Online. This is similar behavior to the EXOV1 module, e.g.

Connect-ExchangeOnline [-UserPrincipalName <UPN>]

When required, satisfy the Multi-Factor Authentication logon process, and you
are done. Be advised that the EXOv2 module also supports
Delegated Access
Permissions
(DAP), allowing partners to connect to customer tenants by
specifying
-DelegatedOrganization <mycustomer.onmicrosoft.com>
when connecting.

Also note that apart from the EXO cmdlets, the current module also offers few other interesting commands and helper functions apart from the ones for housekeeping:

  • Connect-IPPSSession to connect to Security & Compliance center or Exchange Online Protection, depending on licensing. This command was also available in EXOv1.
  • Get-UserBriefingConfig & Set-UserBriefingConfig. These are a bit out of context, as these commands allow you to enable or disable the Cortana Briefing for users.
  • IsCloudShellEnvironment indicates if you are running from PowerShell or Azure Cloud Shell, which might be useful in scripts to determine the current context.

The EXOv2 cmdlets and their regular equivalents are shown in the table below:

EXO v1 or Remote
PowerShell
EXO v2
Get-MailboxGet-EXOMailbox
Get-MailboxFolderPermissionGet-EXOMailboxFolderPermission
Get-CASMailboxGet-EXOCASMailbox
Get-MailboxFolderStatisticsGet-EXOMailboxFolderStatistics
Get-MailboxPermissionGet-EXOMailboxPermission
Get-MobileDeviceStatisticsGet-EXOMobileDeviceStatistics
Get-RecipientGet-EXORecipient
Get-RecipientPermissionGet-EXORecipientPermission

What you might notice is the absence of any Set-EXO* cmdlets. This is true, and there is no word yet on if and when Set cmdlets will be introduced. That said, the biggest speed gain is often in bulk retrieval of data, not so much in altering one or more attributes. Until then, do not
de
spair though, as you can pipe output of the EXO cmdlets to their regular cmdlet,
e.g.

Get-EXOMailbox michel | Set-Mailbox -EmailAddresses @{Add='michel@myexchangelabs.com'}

This construction will also provide the additional benefit of parallel processing of objects as they pass through the pipeline, but more on that later.

Now comes another thing you should be aware of, and that is that these EXOv2 cmdlets might not use the same parameter sets as their v1 equivalent. Simply said, you cannot perform a simple Find and Replace operation in your script replacing Get-Mailbox with Get-EXOMailbox to start enjoying benefits of the new module.

When running a cmdlet like Get-EXOmailbox, you might notice that it returns only a subset of the attributes you might expect. Similar to what Properties does for Active Directory module, the EXOv2 module requires you to specify the individual Properties to return. Alternatively, you can use PropertySets to select a predefined set of attributes. For example, Get-EXOMailbox supports PropertySets such as All, Minimum (default), Policy, Quota and Retention to name a few. When needed, you can combine PropertySets, so something like the following is possible:

Get-EXOMailbox -Identity michel -PropertySets Quota,Policy

A small note on the PropertySet All: Just like Get-ADUser .. -Properties
*
is considered bad practice as you can impact resource usage and usually return more than what you need, using -PropertySets All
for every call is also a bad idea. All is convenient, but make sure you only return the data you need. Be a good person.

To see which EXOv2 cmdlets support PropertySets, use:

(Get-Command -Noun EXO* -Module ExchangeOnlineManagement).Where{$_.Parameters.propertySets}

Performance

Now, I suppose we want to get an indication of the performance enhancements by comparing EXOv2 and equivalent operation using v1 cmdlets. In this simple example we are returning quota information for some 50.000 mailboxes:

In this case, it is not the 4-8x improvement, but more than twice as fast is significant nonetheless. Especially if you are running interactively. To see the impact of parallel processing in the pipeline, we run the following:

As shown, there is a substantial increase in performance, but of course your mileage may vary depending on things like the number of objects, the attributes you require, and any filtering
applied.
Note that the PropertySet StatisticsSeed used in the example is a very minimal set of attributes which you can use if you only wish the refer to the objects, such as userPrincipalName, primarySmtpAddress and externalDirectoryObjectID.

Speaking of filtering, one would expect that server-side filtering (-Filter) would show an improvement in terms of speed over client-side filtering (Where), as filtering at the source is far more efficient in terms of result set and data to send over. However, it seems that due to the nature of a shared environment, sending superfluous data over the wire is less of a penalty than local filtering. Of course, your mileage may also vary here, so experiment what works best for your situation. Also, not every attribute is supported for filtering with these EXO cmdlets, which lies in how Graph exposes data. More information on that here.

When your session times out or disconnects, you will see that the module tries to reconnect your session; something which you would have to programmatically solve for the v1 module or regular remote PowerShell:

Certificate-based Authentication

Exchange administrators often have a requirement to run unattended scripts against Exchange Online, for example scheduled reports or as part of another process. In the past, this lead to setups where service accounts and stored credentials were used. Later this was improved by the ability to apply Conditional Access to limit these logons to on-premises infrastructure.

The problem with Multi-Factor Authentication is that it requires interaction with end-user to approve the sign-on. Of course, while your token is still valid, you can easily (re)connect to Exchange Online just by providing the Username Principal Name, which will reuse the token if it didn’t expire. But all in all, these solutions are high maintenance, and far from ideal from a security perspective.

Here comes certificate-based authentication, which is supported in version 2.0.3 and up of the EXOv2 module. In short, certificate-based authentication allows you to log on to Exchange Online using:

  • PowerShell
  • EXOv2 module
  • A (self-signed) certificate containing private key
  • Enterprise App registration in Azure Active Directory which contains the public key of this certificate, and proper assigned Azure AD role(s).

Note: Enterprise app registration may require Azure AD P1/P2 license.

To install the EXOv2 2.0.3 version of the module (preview at time of writing), use:

Install-Module ExchangeOnlineManagement -AllowPrerelease

Note that it might complain if you have the GA version of the module installed, in which case you need to uninstall the GA module first, or you can install them side-by-side by specifying -Force.

Next, we need to create a self-signed certificate. To accomplish this, we can use the script published here. To create the certificate, simply use:

.\Create-SelfSignedCertificate.ps1 -CommonName 'EXOv2' -StartDate 7/30/2020 -EndDate 7/30/2021

Note that you need to provide a password to protect the PFX file containing the private key. Also do not forget to import the PFX in your local certificate store. When importing, you can mark the certificate as non-exportable, which prevents admins to transfer the certificate to other systems.

Import-PfxCertificate -CertStoreLocation Cert:\CurrentUser\My -FilePath .\EXOv2.pfx -Password (Read-Host -AsSecureString)

After importing, you can check for the certificate’s presence using:

Get-ChildItem Cert:\CurrentUser\My | Where {$_.Subject -eq 'CN=EXOv2'}

The Subject should be the CommonName you used when generating the certificate. The thumbprint of our certificate is 49A4A73B4696718676770834BCD534DE35030D2C. We are going to use this later on to connect.

Now we need to set things up in Azure Active Directory:

  1. Open up the Azure Active Directory Portal, and navigate to Active Directory.
  2. Select App registrations, and click New registration.
  3. Give the App a meaningful Name, and select Accounts in this organizational directory only. Set Redirect URI to Web and leave the URL blank. Then, click Register.

    clip_image013[4]

    Note that our App has been assigned an Application (Client) ID. Make note of this value, as we will need it to connect later on.
  4. Next, we need to configure the App permissions. Select API permissions. User.Read should show up as default. Click Add a permission, and locate Office 365 Exchange Online from the APIs my organization uses tab. Select Application permissions, and in the next screen expand Exchange and check Exchange.ManageAsApp. We are done here, so click Add permissions.
  5. Only thing left now is to Grant admin consent, which can be done by clicking Grant admin consent for <tenant>. When done, the Status column for Exchange.ManageAsApp permission should have changed to Granted for <tenant>.

    API Permissions
  6. Now we need to associate this App with out certificate. Select Certificates & Secrets, and click Upload certificate. Pick the certificate file which we generated earlier, and select Add.

    clip_image017[4]
  7. Last step is to assign the App one of the built-in Azure AD roles. Go to the Azure Active Directory blade, and select Roles and administrators. To manage Exchange Online using PowerShell, you need to assign the Exchange Administrator role; for Security & Compliance, you can assign the Compliance Administrator role.

    Select the desired role(s), and click Add assignments in the assignments overview screen. Note that when picking security principals, the App might not show up initially, and typing its first few letters might help. Click Add to assign the role.

    clip_image019[4]
    Note that the UserName mentioned in the overview is the Application ID.

Now we are done configuring the back end, we can look again at connecting. This should now be as simple as running:

Connect-ExchangeOnline -CertificateThumbprint '49A4A73B4696718676770834BCD534DE35030D2C' -AppId '0d3f8f4c-34fb-4a22-8466-80fd7379593b' -Organization '<tenant>.onmicrosoft.com'

Where:

  • CertificateThumbprint is the thumbprint of the self-signed certificate you created earlier.
  • AppID is the Application (Client) ID of the registered App.
  • <tenant>.onmicrosoft.com the initial domain name of your tenant.

Note that you can also connect specifying the CertificateFile instead of Thumbprint, but then you need to provide the password as well via CertificatePassword. Having the certificate in the certificate store of the administrator account or account running the task and just specifying the thumbprint is more convenient and requires zero interaction.

If all steps above were followed correctly, you should now be connected to Exchange Online, without any MFA interaction.

A final note is that Connect-IPPSSession mentioned earlier does not support certificate-base authentication.

What about other Workloads

You can use the same certificate-based authentication to connect to several other workloads as well. That is, provided you have installed the required PowerShell module and the Azure AD role you assigned to the Application has adequate permissions. You can use the commands below to connect to these workloads. A small note that the commands to connect may use a different parameter names for AppId or Organization, e.g. AppId, ApplicationId or ClientId and Organization and TenantId are same things in the examples below.

AzureAD (2.x or Preview)

Connect-AzureAD -CertificateThumbprint '49A4A73B4696718676770834BCD534DE35030D2C' -ApplicationId '0d3f8f4c-34fb-4a22-8466-80fd7379593b' -TenantId '<tenant>.onmicrosoft.com'

MicrosoftTeams (GA or Test)

Connect-Microsoftteams -CertificateThumbprint '49A4A73B4696718676770834BCD534DE35030D2C' -ApplicationId '0d3f8f4c-34fb-4a22-8466-80fd7379593b' -TenantId '<tenant>.onmicrosoft.com'

Microsoft Graph

Connect-Graph -CertificateThumbprint '49A4A73B4696718676770834BCD534DE35030D2C' -ClientId '0d3f8f4c-34fb-4a22-8466-80fd7379593b' -TenantId '<tenant>.onmicrosoft.com'


Audit

The logons which are performed in the context of the Application are viewable in the Azure Sign-Ins at https://aka.ms/iam/rtsp

Note that this view is currently in preview, and there might be a slight delay before logon shows up.

Final Notes

It would be nice if there would be a way to incorporate Exchange granular Role-Based Access Control model into the permissions model. Granting Apps only the built-in Azure AD roles is somewhat limiting, and it would be nice to restrict accounts in only being able to run the cmdlets and parameters they need to use.

When running Exchange cmdlets, you will find these in the audit log but with the <tenant>\AppID as UserName. Therefore, best thing to do is to use a single App registration for each individual administrator or process, instead of using a single App registration and multiple certificates.

And finally, it would be nice if the various teams would align their cmdlet and parameter naming schemes for consistency.


Hybrid Configuration Wizard & F12

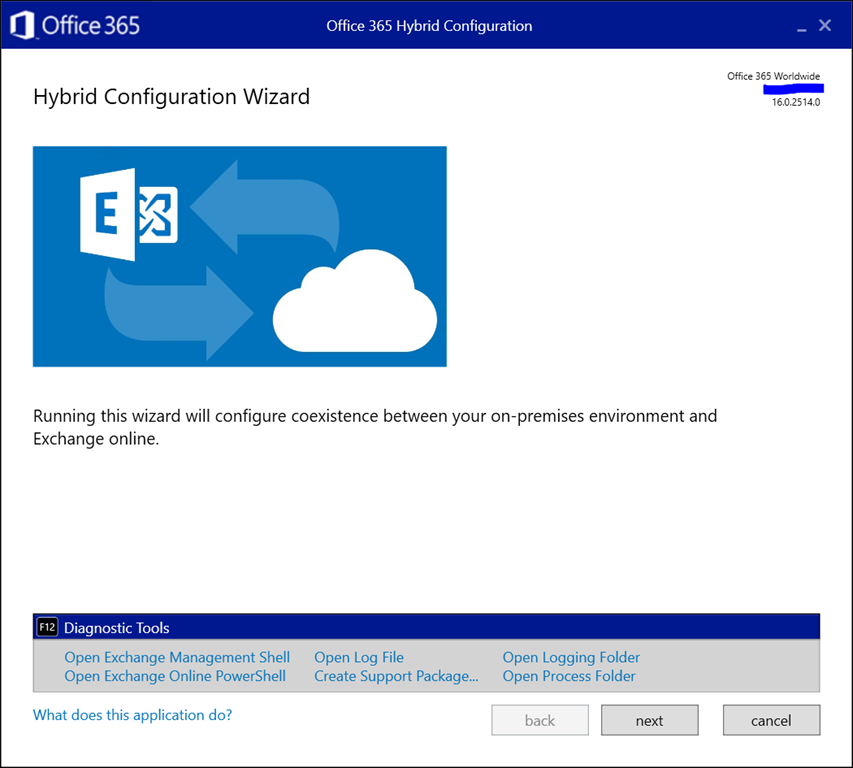
A small tip for those running the Exchange Hybrid Configuration Wizard. As announced at Ignite yesterday, a convenient feature was added to the HCW and is available now. Pressing F12 in the HCW will now open up a panel with shortcuts to the following tools and locations:

  • Exchange Management Shell
  • Exchange Online PowerShell
  • (current) Hybrid Configuration Wizard Log File
  • Create Support Package (to zip HCW logs for support)
  • Open Logging folder (of HCW)
  • Open Process Folder (of the HCW app)

Here is how it looks:

image

This might save you an occasional click or two.

Comparing Sets of Cmdlets

powershellWith the speed of development in Office 365, it is sometimes hard to track which changes have been made to your tenant. Of course, there is the roadmap and message board which you can use to keep up to date, but those are in general high level descriptions. Sometimes you may want to see what are the changes at the cmdlet level in your tenant, between tenants, or Azure Active Directory module. And there is also the occasional gem in the form of a yet undocumented cmdlet or parameter which could hint at upcoming features.

For this purpose I have created a simple script which has two purposes:

  1. Export information on the current cmdlets available through Exchange Online or Azure Active Directory.
  2. Compare two sets of exported information, and display changes in a readable way.

The script is in PowerShell (of course), and is called Compare-Cmdlets.ps1. To export information, you need to be already connected to either Exchange Online or Azure Active Directory (or both).

To export cmdlet information, use:

.\Compare-Cmdlets.ps1 –Export

For Exchange Online and Azure Active Directory, separate export files are created. The files are prefixed with a timestamp and postfixed with the Exchange Online build or Azure Active Directory module version, e.g. 201803121814-ExchangeOnline-15.20.548.21.xml or 201803121815-AzureAD-2.0.0.137.xml.

After a few days/week, or when connected to another tenant or using a new Azure Active Directory PowerShell module, run the export again. You will now have 2 sets of Exchange Online or Azure Active Directory cmdlets, which you can compare using the following sample syntax:

Compare-Cmdlets.ps1 -ReferenceCmds .\201801222108-ExchangeOnline-15.20.428.21.xml -DifferenceCmds .\201803120926-ExchangeOnline-15.20.548.21.xml

image

A progress bar is shown as comparison might take a minute. When the script has finished checking the two sets, you will see output indicating changes in cmdlets, parameters or switches, e.g.

image

Download
You can find the script on the TechNet Gallery or GitHub.

Connecting to Office 365/Exchange

powershell

Last update: Version 3.17, September 8, 2023

Almost 3 years ago, I wrote an article on how to enhance the PowerShell Integrated Scripting Environment, or ISE. That seemed adequate for the Exchange admin back then, who would mostly connect PowerShell sessions to their on-premises environment, and occasionally a bit of Exchange Online.

Fast forward to 2015, most modern Exchange administrators not only require a connection – if any – to their Exchange on-premises environment, but likely to one or more of the Office 365 services as well, including Exchange On-Premises, Azure Active Directory, Exchange Online Protection, Microsoft Teams, Skype for Business Online, SharePoint Online, Azure Information Protection or Compliance Center.

All these services use a different PowerShell session, use a different endpoint FQDN, and in some cases require a locally installed PowerShell module. Likely common denominator is the credential used to access each of these services. So, tired of re-entering my credentials every time when switching from Exchange Online to Exchange Online Protection, I created a script with a set of functions to allow me connect to each individual Office 365 service or Exchange Online:

  • Connect-AzureActiveDirectory: Connects to Azure Active Directory
  • Connect-AIP: Connects to Azure Information Protection
  • Connect-ExchangeOnline: Connects to Exchange Online
  • Connect-SkypeOnline: Connects to Skype for Business Online
  • Connect-EOP: Connects to Exchange Online Protection
  • Connect-ComplianceCenter: Connects to Compliance Center
  • Connect-SharePointOnline: Connects to SharePoint Online
  • Connect-MSTeams: Connects to Microsoft Teams
  • Get-Office365Credentials: Gets Office 365 credentials
  • Connect-ExchangeOnPremises: Connects to Exchange On-Premises
  • Get-OnPremisesCredentials: Gets On-Premises credentials
  • Get-ExchangeOnPremisesFQDN: Gets FQDN for Exchange On-Premises
  • Get-Office365Tenant: Gets Office 365 tenant name (SharePoint)
  • Set-Office365Environment: Configures Uri’s and region to use
  • Get-TenantID: Returns TenantID using previously used credentials
  • Update-Office365Modules: Updates supported Office 365 modules
  • Report-Office365Modules: Report on known vs online module versions

Note that functions and credentials used in the script are global, and in principle only need to be entered once per shell or ISE session. If you need different credentials, call Get-Office365Credentials again. User interaction is a very basic (Read-Host), but it does the job. The script will also detect if  any PowerShell module supporting Multi-Factor Authentication is installed. If so, you will be prompted if for using MFA when authenticating to workloads such as Exchange Online, Azure Active Directory, Microsoft Teams, Skype for Business Online or SharePoint Online.

Requirements
During initialization, the script will detect the modules which are required for certain Office 365 services. When not installed, it will notify you, and provide a link where to obtain the PowerShell module. The related Connect function will not be made available. PowerShell is required to run this script, which is tested against version 5.1 (but should work with lower versions down to version 3).

Usage
The functions are contained in a script called Connect-Office365Services.ps1. You can call this script manually from your PowerShell session to make the functions available. However, more convenient may be to have them always available in every PowerShell or ISE session. To achieve this, you need to edit your $profile, which is a script which always starts when you start a PowerShell or ISE session. By default this file does not exist and you need to create it, including the path. Also note that the files for PowerShell and ISE are different, Microsoft.PowerShell_profile.ps1
and Microsoft.PowerShellISE_profile.ps1 respectively.

Now, of course you can copy and paste the functions from the script file to your own $profile. Better is to call the script from your $profile, as this allows you to overwrite the Connect-Office365Services.ps1 with updates. To achieve this, assume you copied the Connect-Office365Services.ps1 in the same location as your $profile, for example C:\Users\Michel\Documents\WindowsPowerShell. You can then make PowerShell and ISE call this script by adding the following line to the $profile scripts:

& “$PSScriptRoot\Connect-Office365Services.ps1”

Now when you start a PowerShell session, you might see the following:

cos175

This shows the default environment is targeted (AzureCloud), the Exchange Modern Authentication PowerShell module as well as other modules mentioned in the example are installed. When online version checking is enabled (OnlineModuleVersionChecks variable), a check will be performed against the online repository, e.g. PSGallery, and outdated modules will be reported, like the Skype for Business Online module in the example. It’s also possible to automatically update modules setting the variable OnlineModuleAutoUpdate.

When you load the script from ISE, it will show something similar. However, it will also detect ISE and make connect functions available through the Add-On menu:

image

Notes
Customize this script to your liking. Note that for updating modules, you need to have administrator permissions on the local system.

Download
You can download the script from GitHub.

Revision History
Revision information is embedded in the source.

Feedback
Feedback is welcomed through the comments. If you got scripting suggestions, questions or want to report bugs, you can do this through GitHub or by using the contact form.

Ignite 2015, Takeaways

ignite ButtonDespite not being present, the information presented at Microsoft Ignite can be followed by monitoring certain sources on social media. Twitter still seems to be the platform of choice, but you may need to narrow down your stream of tweets using filters or only monitor a selected group of people. For example, the stream of tweets during the keynote using the hashtag #MSIgnite was overwhelming.

This post is an overview of things announced at Microsoft Ignite 2015 related to Exchange. Note that information presented at Ignite regarding Exchange 2016 was all subject to change as Exchange 2016 is still a work in progress.

Rumor on day 1 was that Microsoft Ignite is going to be in Chicago for the next 4 years as well. That is at least true for next year, as Microsoft announced that Ignite 2016 will be held in Chicago from May 9th to May 13th, 2016.

Roadmap

  • Exchange 2016 Public beta announced for Summer 2015. RTM is expected Fall/Winter 2015.
  • Customers can join the Exchange 2016 TAP program at http://aka.ms/joinoffice.
  • Office 2016 is now in Public Review, and is available at here.
  • Office Graph and Delve will be able to digest on-premises information via Hybrid connector and SharePoint 2016.

Architecture

  • Exchange 2016 will only have the Preferred Architecture multi-role setup, so no more CAS or Mailbox server-only deployments. Visible in Setup UI as well as Unattended setup (roles parameter).
  • The Edge role will be available in RTM.
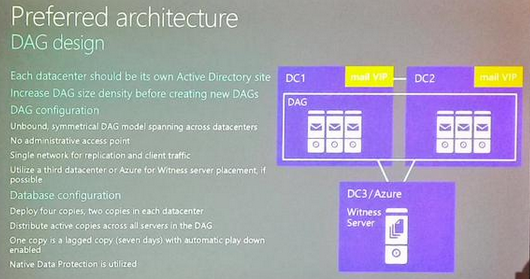
  • More emphasis on Preferred Architecture, which isn’t very different for Exchange 2016 from Exchange 2013:
    • DAG design with unbound symmetrical model.
    • Four database copies (2 in each DC), 3 database copies and one lagged copy (7 days).
    • FSW in Azure or 3rd data center (preferred).
    • Single NIC for client and replication traffic.
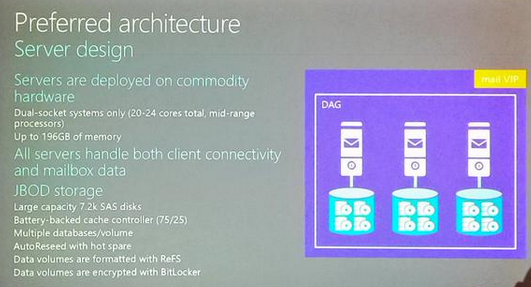
    • Use commodity hardware with 20-24 core/up to 196GB nodes, utilizing JBOD with large disks, multiple databases per volume, Autoreseed with hot spare and using ReFS formatted, BitLocked encrypted data volumes.
    • Office WebApp Server farm in each DC with bound namespace and affinity.
  • Exchange 2016 MAPI/CDO is death – use RestAPI’s or Exchange Web Services (EWS).
  • MAPI/HTTP will be the default client protocol for Outlook with Exchange 2016. MAPI/HTTP will be a per-user setting in Exchange 2016. For Exchange 2013, the per-user setting will be introduced with a future CU.
  • Office WebApp Server required to view or edit Office documents from OWA 2016.
  • When required, scale up by add another node rather than scale up by adding resources like CPU or memory.
  • DAGs spanning more than 2 data centers are not recommended.
  • Use public and private namespace for Exchange 2016 Outlook Anywhere to leverage Kerberos for internal authentication.
  • For Exchange 2016, claims-based authentication will require Windows 2016 ADFS (version 4?).
  • The Exchange team put up a blog post on Exchange 2016 architecture here.

image image

Deployment

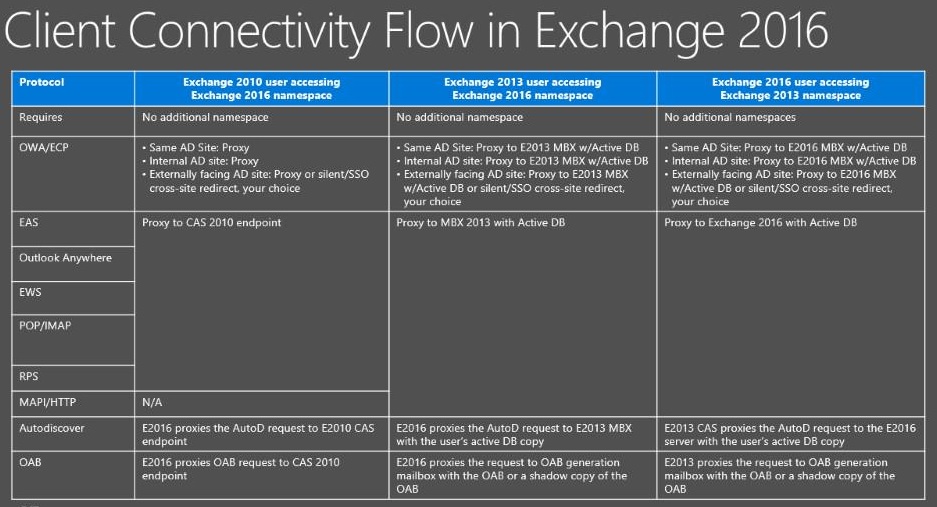
  • Exchange 2016 can proxy traffic from Exchange 2013 (down-level proxy)  and vice-versa (up-level proxy). This means you don’t have to upgrade Exchange servers in your internet-facing site prior to upgrading other locations. Up-level proxy transition is preferred.
  • Exchange 2010 to Exchange 2016 transition path is same experience as Exchange 2010 to Exchange 2013. Regarding Kerberos authentication, check guidance here.
  • Exchange 2016 can co-exist with Exchange 2010 SP3 RU11+ or Exchange 2013 CU10+. Exchange 2013 + 2016 can share one single Alternate Service Account (ASA) for Kerberos authentication.
  • There is no co-existence possible with Exchange 2007, which means you will need to perform a double-hop migration if you want to transition from Exchange 2007 to Exchange 2016.
  • Exchange 2016 will support installation on Windows Server 2012 R2 and Windows Server 10 (2016).
  • Exchange 2016 will require Windows Server 2008 R2 Forest and Domain Functional Levels or up, running at least on Windows Server 2008 R2 domain controllers.
  • Exchange 2016 will support at least Outlook 2010 SP2 with KB2956191 and KB2965295, Outlook 2013 SP1 with KB3020812, and Outlook 2016 desktop clients.
  • Exchange 2016 will require .NET Framework 4.5.2. Scalability improvements coming in .NET Framework 4.6 (release candidate in preview, don’t install yet).
  • Office WebApp Server can’t be installed on Exchange 2016 server, and requires web publishing through bound namespace (and thus possibly certificate implications) anywhere you want to work with attachments from OWA 2016. Don’t expose internal Office WebApp namespace externally. Use Set-OrganizationConfig -WACDiscoveryEndpoint and restart MSExchangeOWAAppPool to configure Office WebApp Server for OWA.
  • Certificate names required:
    • Exchange 2010 + 2016: Bound= 12, Unbound= 7
    • Exchange 2013 + 2016: Bound= 10, Unbound= 7
    • Exchange 2010 + 2013+ 2016: Bound= 10, Unbound= 7
    • Of course, internal MAPI endpoints do not require entry on certificate.
  • Use a dedicated Active Directory site to install and configure Exchange before moving them to a production site.
  • Exchange 2013 and Exchange 2016 introduce new OAB, specify existing OAB on all mailbox databases before installing Exchange 2013/2016.
  • After introducing Exchange 2016 to your environment, move the SystemMailbox{e0dc1c29-89c3-4034-b678-e6c29d823ed9} system mailbox to Exchange 2016, or you won’t be able to export admin audit logs, perform In-Place discovery searches etc.
  • When dimensioning your Exchange deployment, use the calculator.
  • By disabling an Anti-Virus product for troubleshooting, you don’t remove their filter driver. Uninstall if you suspect AV product, or use fltmc to list or unload filter driver.
  • Recommended to set lagged copies to 7 days delay.
  • Exchange 2016 will allow adding mailbox database copies with ConfigurationOnly to postpone automatic seeding. Fast Database Reseeds allows for up to 10 parallel reseeds.
  • On the Exchange server configuration:
    • Use “High Performance” Power Plan.
    • Disable Hyperthreading in physical deployments.
    • Use battery-backed storage controller with 1:3 Read:Write ratio.
    • For RAID, use stripe sets of 1+ factors of 256KB
    • Use GPT partitions
    • Host Exchange binaries on NTFS with 64K cluster size.
    • Host Exchange data on ReFS volumes with Data Integrity Feats disabled.
    • Use BitLocker to secure Exchange volumes.
    • Use JetStress with BitLocker and Virus Scanner if you’re going to use those in production.
    • Do not disable entire IPv6 stack.
    • Do not disable Exchange services post installation.
    • Do not restrict the dynamic TCP port range, e.g. do not use ‘netsh int ipv4 set dynamicport tcp startport=X numberofports=Y‘.
    • Use Exchange Health Checker script to verify configuration, available here.

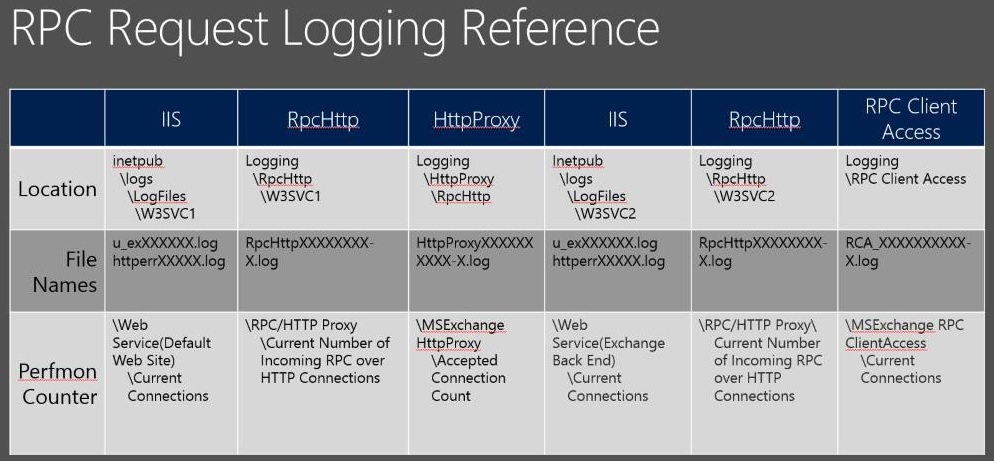
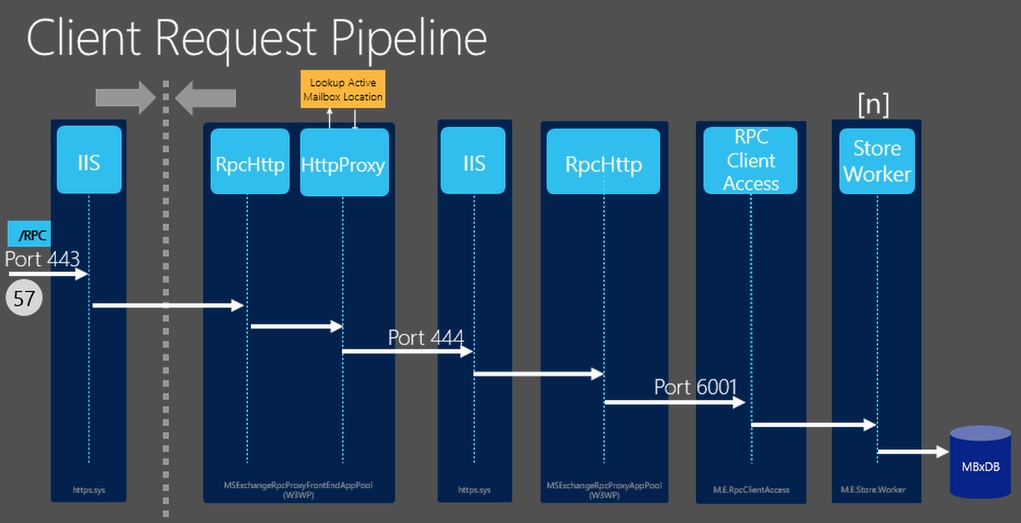
Exchange 2016 Client Connectivity rpcreq

Virtualization

  • Exchange 2013 deployments are now supported on Azure IaaS virtual machine for production environments when using Azure Premium Storage. Amazon AWS is not supported. Most cost-effective remains Exchange On-Premises on physical hardware (or Exchange Online). Official guidance has been updated to reflect this here.
  • When virtualizing Exhange:
    • Do not use memory overcommit.
    • Hyperthreading is OK, but size for physical cores.
    • Do not oversubscribe CPUs, causes queue growth, increased IOPS due to lower indexing throughput, RPC latency issues.
    • Size like physical deployment, but add overhead for CPU (10%).
  • Exchange 2013 now supports Dynamic VHDX (not VHD!) disks for Hyper-V deployments. Will apply to Exchange 2016 as well. JetStress tests showed only 2% additional writes penalty for VHDX (for VHD 20%).

Storage

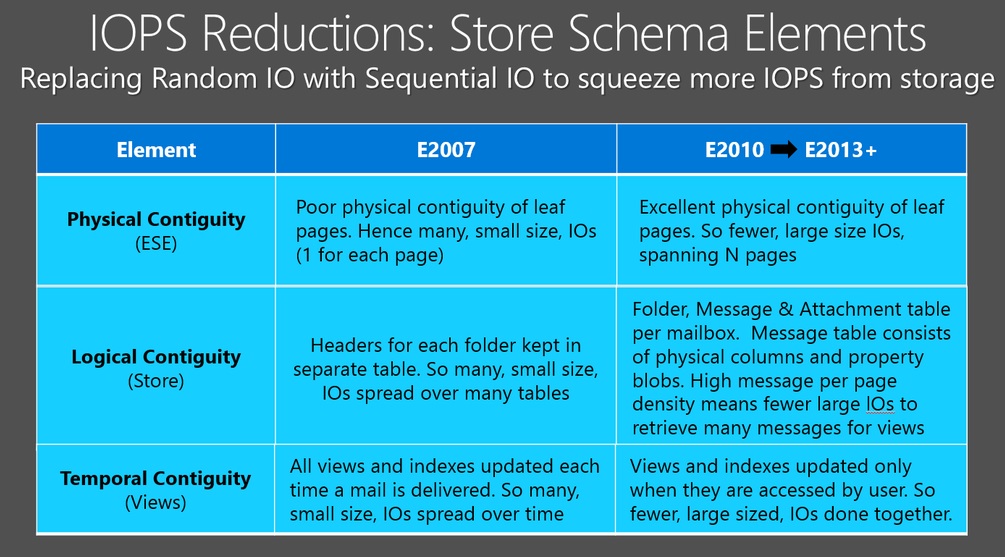
  • Exchange 2016 will require 22% lower IOPS when compared to Exchange 2013 RTM. That means that since Exchange 2003 with 1 IOPS per mailbox, we are down to 0.04875 IOPS per mailbox.
  • Search index will use passive database copies for indexing, instead of copying indexes from the active copy.
  • Delayed LAG play down, depending on disk health (delayed if disk latency more than  20ms). Replay Lag Manager will be enabled by default, for automatic play down of lagged copies when insufficient copies remain available.
  • Usage of ReFS for Exchange data volumes should result in less corruption, thus less reseeds or rebuilds. Exchange 2016 can detect database corruption through DB Divergence Detection. Loose Truncation will make sure Log Files won’t fill up disk space after extended outages.
  • Exchange 2013 and later will report more accurately on mailbox sizes. Accommodate for 30% increase when moving mailboxes from Exchange 2010 or earlier.
  • Autoreseed in Exchange 2016 can fix a single database on a volume.
  • Exchange 2016 Workload Management (WLM) adds Disk Latency Monitor. Can throttle non-critical workloads based on measured disk latencies.
  • Exchange 2016 adds predictive controller or hard disk failure, based on disk read and write latency trends, bad block detection or disk failures.

Exchange IOPS

Availability

  • Database Availability Groups are now by default deployed without an cluster administrative access point or cluster name object (CNO). This reduces complexity and dependencies, but you may need to check with for example your backup vendor as many 3rd party products still access Exchange through this CNO.
  • Exchange 2016 database fail-overs will be 33% faster. Given that Exchange 2013 database fail-overs are about 10 seconds, that should mean they are down to 6-7 seconds.
  • Recommended load-balancing configuration for Exchange 2016 is single namespace, Layer 7 and no affinity. Use load balancer with per-service monitors and features like Slow Ramp (F5) or Least Connections with Slow Start Time (KEMP) to grant servers time to initialize and warm-up.
  • Office WebApp Server requires affinity on the load-balancer.
  • As Exchange 2016 can proxy traffic to Exchange 2013 and vice-versa, both versions can co-exist in the same load balancer server pool.
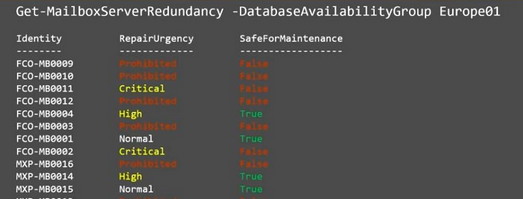
  • Get-MailboxServerRedundancy allows to prioritize repairs and upgrades by inspecting the DAG member servers, database copies and their state.

image.pngclientreq

Management

  • You can manage Exchange 2016 objects from Exchange 2013 Management Shell and Administrative Console and vice-versa. Limited for Exchange 2010, recommended to use Exchange 2010 management tools to manage Exchange 2010.
  • An Exchange 2013 Managed Availability tool was released (MATS) to assist in troubleshooting and diving in the Management Availability related events. The tool is available here.
  • ExMon, the Exchange Server User Monitor, will be back.
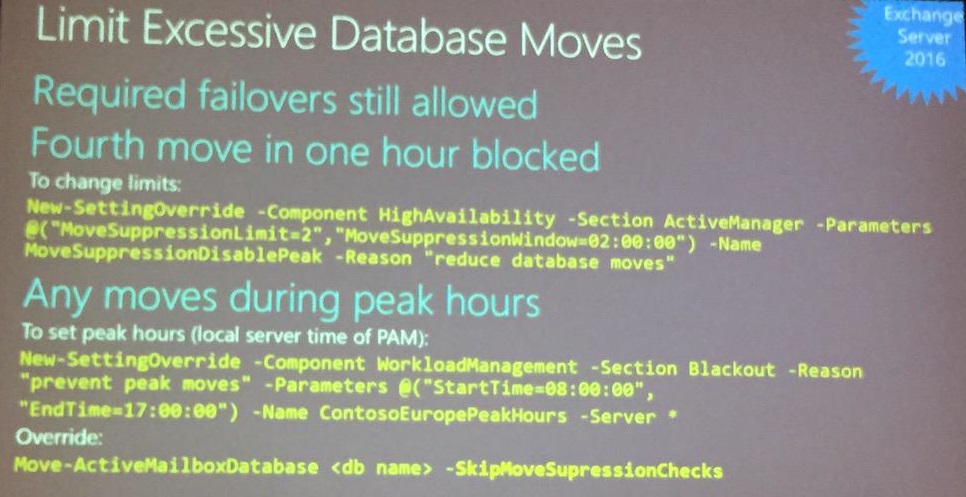
  • Exchange 2016 Workload Management introduces policies to limit or block mailbox moves during peak hours.

Exchange Limit Moves

Public Folders

  • Modern Public Folder migration scripts in $exscripts folder are likely to be outdated. Always use the latest Modern Public Folder migration scripts, which are available here.
  • It’s recommended to host Modern Public Folders in dedicated databases.
  • Modern Public Folders are here to stay, but emphasis will shift to Office 365 Groups. Groups are also expected to replace Distribution Lists. Distribution List naming policies will help enforcing naming policy on Groups. Tool named ‘Hummingbird’ to be made available to move from DL to Groups, or script conversion using new UnifiedGroup cmdlets.

Compliance

  • Exchange 2016 will allow you to put Public Folders on In-Place Hold.

Features

  • Modern attachments in Outlook 2016, Exchange 2016 and SharePoint 2016 allows on-premises customers to offload attachment storage to SharePoint, just sending a link and setting permissions through Outlook. Also, Outlook 2016 contains a convenient MRU list to select recently touched Office documents as attachment. Note that SharePoint is on the roadmap for 2016, which could imply that modern attachments will not be available when Exchange 2016 RTM’s.
  • OWA 2016 will contain a revised ribbon with additional buttons to triage e-mail more quickly, e.g. for archiving or sweep (similar to functionality currently found in outlook.com formerly known as Hotmail). It also contains an Undo button.
  • Outlook 2016 and Exchange 2016 will use always search online. Hopefully this will result in consistent search results between Outlook, OWA and ActiveSync devices.
  • Being able to restore items from the recoverable items with folder preservation is on Microsoft’s radar.

Exchange Hybrid

  • Hybrid Configuration Wizard is now downloadable app, similar to previous OAuth configuration step in HCW. It works with Exchange 2013 and Exchange 2016 deployments, contains AADSync multi-forest support, and OAuth enhancements for MFA configuration. Allows team to introduce changes more quickly.
  • When configuring Hybrid, point your MX records to Exchange Online Protection (EOP) to prevent possible issues with SPF, DMARC or DKIM. This however requires EOP licenses at day 1.
  • 3rd party SMTP gateways sitting between Exchange On-Premises and EOP is not supported.
  • New Hybrid Migration troubleshooter can be found here.
  • Be advised that Exchange Hybrid is not compatible with Alternate Login ID or AlternateID for short. More information here.

Exchange Online / Office 365

  • Exchange Online runs 50.000+ servers hosting 1.2M database copies. Every month, 3.5M database fail-overs occur, 100’s server fail, while adding 1000’s of servers. Still, Exchange Online maintains an availability rate of 99.95%!
  • The Office 365 first release option, which will receive updates and new features first, will have the option to enable this option for the entire organization or per user.
  • Document Tracking now live in Office 365 and clients when using the Azure RMS connector. More information here.
  • Latest Azure Active Directory Sync has password write-back, so passwords changes in Office 365 are synced back to Active Directory on-premises. Get it here.
  • Currently in preview for Azure Active Directory Sync are user write-back (user created in Office 365 is synced back to Active Directory on-premises) and Groups write-back.
  • Office 365 to introduce dynamic Office 365 Groups, which will utilize recipient filters against Azure AD, and auto-expiring and other controls for Office 365 Groups housekeeping.

Note that you can download the Ignite session videos and slides for offline viewing as they become available. A script to accomplish this is available here.

Special thanks to Jeff Guillet, Dave Stork, Andy David, Tony Redmond, Bhargav Shukla John Barsodi, Nathan O’Bryan, John A Cook, Greg Tiber, Ingo Gegenwarth, Richard Hay, Jetze Mellema and Randall Vogsland for keeping us Exchange peeps updated from Ignite!