Back in September 2019, Microsoft announced it would start to turn off Basic Authentication for non-SMTP protocols in Exchange Online on tenants where the authentication protocol was detected as inactive. This is part of an overall movement to deprecate the less secure Basic Authentication, which is unfit to face the security challenges of the modern world, being subject to things like password spray attacks. It’s modern successor, modern authentication or OAuth2, uses a token and claim based mechanism contrary to sending accounts and passwords, and is the preferred authentication method. When combined with Azure AD for authentication, Modern Authentication also supports features such as Multi-Factor Authentication or Conditional Access.
The original date for disabling of Basic Authentication was October 13th, 2020. Then the world had other matters to deal with, and Microsoft extended the timelines. After initially postponing turning Basic Authentication off to second half of 2021, the ‘start date’ for permanently turning the lights off for Basic Authentication was set to October 1st, 2022, as per this article on Docs and MC286990 in the Message Center. Mind the ‘start’ in start date, as flicking the switch for millions of tenants takes time before it becomes effective on your tenant. Organizations do need to anticipate on this change for the first of October.
On September 1st, Microsoft published an update to these timelines as there were still some cases were organizations could not make the deadline of October 1st. To meet these customers “one last time”, organizations can now use the self-service diagnostics to extend disabling of Basic Authentication to January 2023. This needs to be done per protocol, also if organizations requested opt-out or re-enabled Basic Authentication earlier. Details as well as instructions and revised timelines on Basic Authentication switching off are laid out in a new article.
Until then, organizations can (re-)enable Basic Authentication for the protocols they need, using the self-help system in the Microsoft 365 admin center. After entering “Diag: Enable Basic Auth in EXO” in the problem search query, the request will be checked, and Basic Authentication will get enabled. But with the end of support for Basic Authentication, so will this temporary workaround. On a side note, per end of 2020, newly created tenants already have basic authentication disabled by means of security defaults – if those organizations require Basic Authentication for some reason, they will also need to reconfigure security defaults which by default is an all or nothing option for all protocols.
So, with the doomsday counter ticking away for Basic Authentication, what are the consequences for Exchange related workloads organizations might wonder. In this article, I will address some of these concerns.
Update: Microsoft meanwhile has disclosed much awaited details on changes in the native Mail app on iOS. This update is effective per iOS 15.6, and adds support for migrating configured accounts from using Basic Authentication to using Modern Authentication (OAuth). For this work work seamlessly and without user interruption, some configuration is needed on the back-end. Details can be found in a separate article here on this specific topic.
A short blog on something which I find still surprises admins and consultants working with Exchange Online Management module for Powershell. The Exchange Online Management v2 module has been offering support for REST for a while now. One of the benefits of using these REST-based cmdlets, apart from performance and resilience, is that it uses Modern Authentication to connect to Exchange Online, which is the way forward, as Basic Authentication gets directed to the exit.
Now the initial versions of the module supported a limited set of 9 cmdlets. The REST cmdlets used the EXO prefix, such as Get-EXOMailbox as counterpart of Get-Mailbox. I wrote an earlier blog about using EXOv2, configuring the app in Azure and alternative ways to authenticate here.
Per version 2.0.6, which is still in preview, around 250 additional cmdlets got REST support as well, but using their original name and parameter set. You can check the number of cmdlets available after connecting, e.g.
As you can see above, after connecting this version supports 397 cmdlets for my role in addition to the 31 available pre-connecting. Your exact number might vary, based on the roles assigned to your account.
The confusion usually starts when people enter commands or run scripts, and find cmdlets are “missing”. Often they find that the Set/New cmdlet is unavailable, while the Get is available, e.g.
Before, this could be an indication those commands were removed from the role assigned to you, such as the New-MailboxImportRequest cmdlet which only is available if you have mailbox import/export assigned. But in this situation, it could be that the cmdlet does not have a REST call (yet). In those cases, you need to connect using a regular Remote PowerShell session, by specifying -UseRPSSession:
When connecting this way, I have 739 cmdlets at my disposal, including the ones which do not support REST. Note that cmdlets which support REST still will use REST; the commands that require Remote PowerShell will use the imported cmdlet. As a reminder, Remote Powershell requires Basic Authentication, and therefor must be enabled on the system you are connecting from.
Tip: Did you know you can view the release notes of the installed Exchange Online Management module by inspecting the ReleaseNotes property, e.g.
A long overdue blog on a solution which was created per request of an Exchange fellow. The original scenario is an organization spinning off, thereby changing their primary e-mail domain. They wanted to inform relations and partners using the old e-mail addresses of this change. However, this solution might also be helpful to organizations after merger and acquisitions or rebranding.
For the sake of the example, let us suppose Fabrikam was acquired by Contoso. Targeted mailboxes are migrated from the Fabrikam tenant to the Contoso tenant. Fabrikam will contain Mail-Enabled Users forwarding messages to their Contoso mailbox counterparts. The migrated mailboxes now hosted in Contoso will be configured to send notifications to senders which sent mail to the old Fabrikam address.
While organizations can resort to 3rd party tools to set up an Exchange Transport Rule with a generic message, a little script might also do the job, offering a more granular and controlled solution.
Solution The scripted solution is available on GitHub here. It will configure an Inbox rule on the targeted Exchange mailbox(es), which would be the new/migrated mailbox. The rule will trigger when messages land in the inbox which were sent to a specific e-mail address, i.e. the previous e-mail address. It will send out an automatic response, which can consist of a custom subject, message body with an optional embedded image. The configuration of the response is defined in an customizable external XML file:
<?xml version="1.0" encoding="ISO-8859-1"?>
<config>
  <rule>Contoso Autoresponder</rule>
  <subject>Please update your email recipient to Contoso</subject>
  <body>Dear Sender,

Thank you for your message. Fabrikam is now a whole Contoso subsidiary, and the fabrikam.com e-mail address will change to contoso.com. Your e-mail was forwarded to my new e-mail address.

Please update contact information, distribution lists, etc. to update [OldMail] e-mail references with my new [Identity] e-mail address.

[logo]
The Contoso Corporation is a multinational business with its headquarters in Paris.</body>
  <logo>Contoso.png</logo>
</config>
The elements that can be used in the config are:
<rule> defines the name of the Inbox rule to be created. When the script runs, it will update any existing previously created inbox rules of the same name.
<subject> defines the subject of the response.
<body> defines the message body. You can use the following macros here:
[OldMail] will get replaced with the original e-mail address.
[Identity] will get replaced with the new e-mail address.
[Logo] will get replaced with the embedded image.
Optionally, <logo> refers to the file name of the image to embed.
Requirements To run the script, you need the following:
Exchange Server 2013 SP1 or later, or Exchange Online.
Exchange Web Services (EWS) Managed API 2.21 or later (how to, NuGet package exchange.webservices.managed.api).
When using modern authentication or OAuth2, the MSAL library is required (NuGet package Microsoft.Identity.Client). Also, you need to have registered an App in Azure Active Directory with sufficient permissions (e.g. full_access_as_app). After registering the app, Tenant ID, Application ID and certificate or secret is what you need to use with the script to run successfully.
In addition to installing the NuGet packages, you can also store their DLLs in the same folder as the script for portability.
The available parameters and switches are as follows:
Identity specifies one or more e-mail addresses of mailboxes to process. Identity supports the pipeline (see examples).
OldMail specifies one or more old e-mail addresses to use when configuring the autoresponder message. When specifying multiple identities, the number of OldMail entries need to match the number of identities.
Server specifies the Exchange Web Services endpoint, for example outlook.office365.com for Exchange Online. When omitted, Autodiscover will be used.
Impersonation to use impersonation when accessing the mailbox. When using modern authentication, impersonation is mandatory.
TrustAll to accept all certificates including self-signed certificates.
TenantId specifies the ID of the Tenant when using a mailbox hosted in Exchange Online.
ClientId to specify the Application ID of the registered application in Azure Active Directory.
Credentials to specify the Basic Authentication credentials for on-premises usage or against Exchange Online when modern authentication is not an option.
CertificateThumbprint is the thumbprint of the certificate to use for modern authentication. The certificate with the public key needs to stored with the registered application for authentication. The certificate with the private key should be present in the local certificate store.
CertificateFile and CertificatePassword can be used to specify a certificate file to use. The file should contain the private key; the password protecting the certificate file can be specified using CertificatePassword as a secure string.
Secret can be used to specify the secret to authenticate using the registered application. The secret needs to be provided as a secure string.
Template specifies the XML template file to use when configuring or clearing the autoresponder inbox rule. The format has explained above.
Clear specifies if any you want to remove the inbox rules with name specified in the template. Use this when you want to remove autoresponder rules from mailboxes. When using Clear, you don’t need to specify OldMail.
Overwrite specifies if any existing inbox rules with name specified in the template should be overwritten. When omitted, the script will skip processing mailboxes with inbox rules with conflicting names. Use this when you want to configure the autoresponder only on mailboxes which do not have the rule.
Note that usage of the Verbose, Confirm and WhatIf parameters are supported.
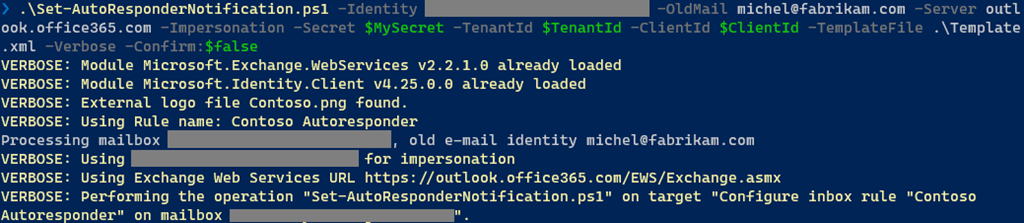
Examples Nothing more explanatory than an example. When we want to configure the autoresponder on a single mailbox, we can use something like:
Here, the autoresponder will get configured on the specified mailbox, triggering when mail has been sent to michel@fabrikam.com using the configuration defined in template.xml. Modern authentication will be used for authentication, using variables for Tenant, Client and in this case secret.
When you want to configure autoresponder for multiple mailboxes, you can for example use a CSV file. It needs to contain two elements which will be passed through pipeline, Identity and OldMail:
After defining the response in a file template.xml, we can use this CSV to configure inbox rules on the Contoso mailboxes identified by Identity, triggering when mail is sent to their OldMail addresses:
What will happen is that for every set of Identity and OldMail, the mailbox specified by Identity will be configured with an inbox rule. When an existing rule is found, which is determined using the <rule> element in the XML template, it will get overwritten. The specified certificate will be picked from the local certificate store to authenticate against Tenant with TenantId, as application specified by ClientId.
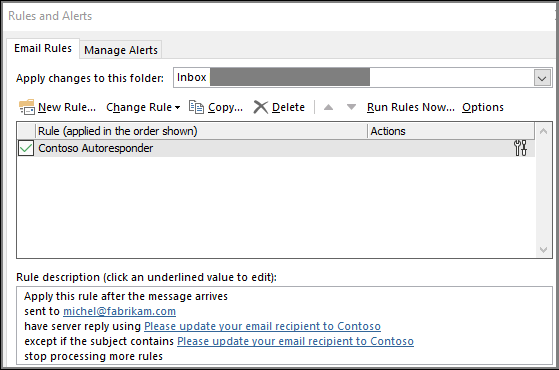
Note that when the user opens Manage Rules & Alerts in Outlook, the configured inbox rule will be visible. This allows the user to remove it when it is no longer required. After a certain period, administrators can centrally remove these rules as well running the script using the Clear switch.
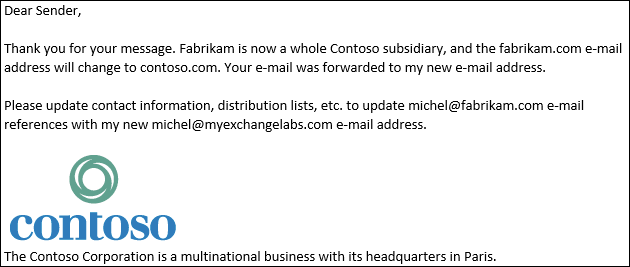
And finally, an example of how this may looks to senders when they receive an autoresponse message, using the sample configuration from the beginning of this article.
Application Access Policy When using the script with modern authentication, you can leverage features such as conditional access to set boundaries for script usage. Also, you can configure application access policies to scope the registered app (script) to a subset of mailboxes. To accomplish this, assign an ApplicationAccessPolicy to the app.
To be more convenient in managing permissions, you can define a distribution group and assign the Application Access Policy with group scope (PolicyScopeGroupId). You then only need to add/remove members as you need to configure mailboxes.
More information about Application Access Policies here. Note that the permissions mentioned to not include full_access_as_app as permission, but it works.
EWS, why not Graph? Microsoft already announced back in 2018 that development on Exchange Web Services will halt in and focus will shift to Graph. As part of this move, a more recent statement announced deprecation of some least-used API per March 2022, stimulating organizations to switch to using Graph. However, the organization looking for a solution wished for an automatic response with HTML as well as an embedded logo. Because of this, I had to use a template as a reply action.
But where Exchange Web Services supports reply with a template, Graph does not offer this functionality. So, until there is more feature parity between Exchange Web Services and Graph, or EWS goes completely out of service, solutions may still be forced to have a look at EWS for certain tasks.
With the introduction of Exchange 2010 at the end of 2009, a native feature was added to Exchange Server for which organizations required 3rd party products before that. The feature which I am talking about is Exchange’s Personal Archives, Online Archives, or In-Place Archiving as it is called nowadays.
Background Archives were introduced at a time when Office 365 was in its early days, many organizations were running Exchange on-premises with mailbox quotas as bandwidth and storage were limited or relatively expensive. It was up to end users to make sure their mailbox remained within its limits, either by removing either old items, large items or just move them out of their mailbox to those pesky .PST files.
Archives introduced benefits such as lowering disk footprint by taking infrequently used items out of the primary mailbox (which then could only synchronize in full) to the archive, which is basically an additional mailbox for long-term storage. Exchange’s built-in Messaging Records Management (MRM) through retention policies and tags can be used for automatic moving of older items to the archive.
Archives also come with few downsides, especially in the early days. Most notably are perhaps clients not supporting archives at all, or searches not spanning both mailbox and archive. Also, and this is not to be underestimated, end users do not always grasp the concept of archives and the impact on the tasks and tools they use. It’s not uncommon to see people panicking about “missing data” in service tickets, only to discover their “missing data” was moved to their archive by the company retention policy after some digging.
In recent years, I have seen archives becoming less relevant, and organizations adopting the large mailbox concept in favor of lean and mean mailboxes with archives. There are still exceptions of course, usually in the form of substantial – usually shared – mailboxes. For those, staying with Exchange Online archives – and when needed auto-expanding archives – is usually still an option due to the different type of mailbox interaction, or to circumvent Exchange’s storage limitations or Outlook for Desktop’s synchronizing of offline cache files before issues might be seen. The maximum number of items per folder is such a limit, however these have been raised or done away with in recent years. Non-stubbing 3rd party archive solutions taking data out of Exchange can also be a option.
The Problem Switching to the large mailbox concept creates a problem for those organizations that have already enabled in-place archives for their end users: How to get that data back from those archives to the primary mailbox. While retention policies can move data in opposite direction, there is no such thing as a reverse-retention policy. Also, not every organization would like to instruct end users to unarchive this contents themselves, as it is prone to failure, blocks Outlook for Desktop from doing anything else and might result in abandoned operations which limits future actions as moves are still happening in the background.
When investigating a possible solution I found that there is no other way to accomplish this, than to programmatically move contents from the in-place archive to the primary mailbox. While there is a ‘archive’ operation for mailbox items (which moves it to the assigned Archive folder, not the in-place archive) there is no other single API call to perform this task. Also, the solution would have to use Exchange Web Services, as a limitation in Microsoft Graph makes it incapable of moving messages between multiple mailboxes.
Note: If I overlooked something in this area, please let me know.
Solution To help organizations accomplish this task, I wrote a PowerShell script which requires the following:
Exchange Server 2013 SP1 or later, or Exchange Online.
Exchange Web Services (EWS) Managed API 2.21 or later (how to, NuGet package exchange.webservices.managed.api).
When using OAuth, the MSAL library is required (NuGet package Microsoft.Identity.Client). Also, you need to have registered an App in Azure Active Directory; the Tenant ID, Application ID and certificate or secret is what you need to provide the script with to operate successfully.
In addition to installing the NuGet packages, you can also store the DLLs in the same folder as the script.
Note: Untested with Primary mailboxes on-premises and Exchange Online Archives.
The script Invoke-Unarchive will perform the following tasks:
Invoke-Unarchive will move contents from the in-place archive back to the primary mailbox.
The most optimal operation will be chosen:
Folders present in archive but not in primary mailbox will be moved in one operation.
Folders present in archive and primary mailbox are merged. Items in those folders are moved in batches.
The same steps are repeated recursively per folder for the whole archive.
If, after moving, a folder in the archive is empty, and it is not a non-removable well-known folder, it will be removed.
Optionally, Invoke-Unarchive can also move contents stored in the Recoverable Items from the archive to the primary mailbox.
Invoke-Unarchive will handle throttling, either by honoring the returned back-off period or by adding delays between operations.
Moving items is asynchronous, and Invoke-Unarchive needs to wait for Exchange to complete the previous move to folder X before it can move the next set of items to folder X.
Do not forget to reassign retention policies causing archival, or you might have the run the script again at later moment.
Syntax The parameters to call Invoke-Unarchive.ps1 are:
Identity to specify one or more mailboxes to unarchive items for.
Server to specify the FQDN of the Client Access Server to use. When omitted, Autodiscover will be used.
IncludeRecoverableItems to instruct the script to process deletions stored in the Recoverable Items as well.
Impersonation to use impersonation when accessing the mailbox. When using modern authentication (OAuth), impersonation is mandatory.
Force to force moving of items without prompting.
NoProgressBar to prevent progress status.
TrustAll to accept all certificates including self-signed certificates.
TenantId specifies the ID of the Tenant when using a mailbox hosted in Exchange Online.
ClientId to specify the Application ID of the registered application in Azure Active Directory.
Credentials to specify the Basic Authentication credentials for on-premises usage or against Exchange Online when OAuth is not an option.
CertificateThumbprint is the thumbprint of the certificate to use for OAuth. The certificate with the public key needs to stored with the registered application for authentication. The certificate with the private key should be present in the local certificate store.
CertificateFile and CertificatePassword to specify the file of the certificate to use. The file shoud contain the private key, and the password to unlock the file can be specified using CertificatePassword.
Secret can be used to specify the secret to authenticate using the registered application.
Note that Credentials, CertificateThumbprint, CertificateFile + CertificatePassword and Secret are mutually exclusive.
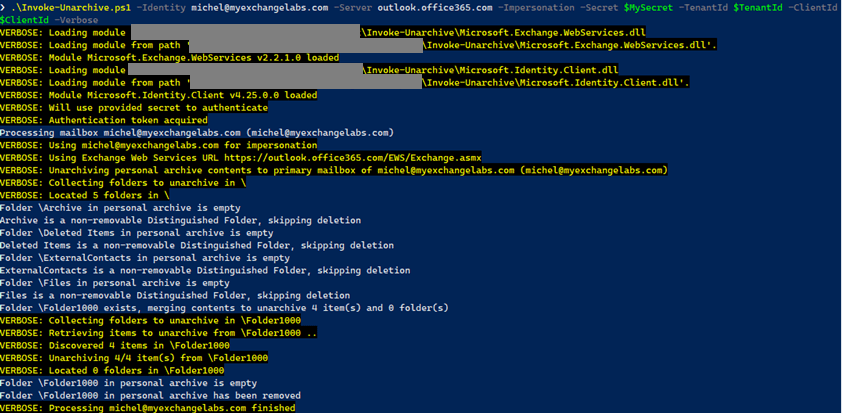
Example Below shows an example run against a test-mailbox using modern authentication (OAuth). The common parameter Verbose is used to display additional output.
Final Notes The EWS operation – especially moving items – is not necessarily slow, but against Exchange Online processing large archives can take considerable amount of time due to throttling. When moving a significant number of items using Outlook for Desktop, you will likely run into Outlook abandoning the operation after which you need to wait for Exchange to finish pending moves before you can continue with this task. Using the script, you can take away this unarchiving task from end users by running the operation in the background in one or multiple runs.
After updating your PowerShell modules which support managing parts of the Microsoft 365, some of us are curious about what changes are introduced with the updated module. In the world of continuous change, it is hard to keep track of these changes. New cmdlets or parameters get added to support new features, and some get removed as they become obsolete. So, how to discover what those changes are after updating to the latest module?
Time to blog on a small script I created for this purpose a long time ago, Compare-Cmdlets.ps1. This script has two operating modes:
Export currently available cmdlets and parameters for supported modules.
Compare two exports of cmdlets & parameters and report the differences.
Currently, the following command sets are supported:
Module
Test Cmdlet
Export File
AzureAD
Get-AzureADUser
AzureAD-<version>.xml
ExchangeOnline
Get-Mailbox
ExchangeOnline-<version>.xml
ExchangeOnlineManagement
Get-ExoMailbox
ExchangeOnlineManagent-<version>.xml
MicrosoftOnline
Get-MsolUser
MSOnline-<version>.xml
Teams
Get-Team
MicrosoftTeams-<version>.xml
Command sets are exported per module, where a module is assumed to be present by a simple check for cmdlet availability (specified in column Test Cmdlet). That is, if Get-Mailbox is available, the ExchangeOnline module is assumed to be available. It does not distinguish between the Exchange PowerShell module or ‘classic’ Remote PowerShell session, nor will it take into account the repository origin of the module, nor if the Get-AzureADUser is coming from the AzureAD or AzureADPreview module.
That said, here’s how this is works. Load up PowerShell and have your modules installed and ready. Some modules like ExchangeOnlineManagement require connecting to the service first to import the cmdlet functions, so for ExchangeOnlineManagement run Connect-ExchangeOnline first. Same applies to the newer Teams modules, where the Skype Connector functions are only available after running New-CsOnlineSession.
Then run Compare-Cmdlets to export the cmdlets and parameters for those modules. The commands will by default be exported to an XML in a subfolder named ‘data’. The name of the file is mentioned in the table above. If you want to use a different folder to store the XML files, use DataFolder parameter.
Note that with Exchange, the cmdlets available to you depend on which role you have been assigned in Exchange’s Role-Based Access Control model. For example, if you haven’t explicitly assigned Mailbox-ImportRequest to your account, you will not see it in the exports. Therefor, when exporting module changes, it is required using an account with the same roles assigned to have proper exports. But when needed, you can also use it to report on command set differences between two Exchange Online accounts.
After updating some of the modules, or downloading one of the command set reference XMLs I stored with the script on GitHub, you can use Compare-Cmdlets to compare different versions of module exports. For example, to compare the cmdlets of Microsoft Teams module 1.1.4 with those after updating to 1.1.5, use
The cmdlet Get-TeamChannel has a new GroupId parameter.
The cmdlet New-CsGroupPolicyAssignment parameter PolicyType has been removed.
The cmdlet Add-TeamChannelUser is new.
Note that common parameters (e.g. Verbose and ErrorAction) and optional common parameters (e.g. WhatIf) are left out of the equation. Also, parameters are not compared in depth and only presence is checked. If for example a parameter changes type (e.g. string to multivalue), Compare-Cmdlets does not pick that up.
As-is, the script is made to run on demand from an interactive PowerShell session. Ideally, this would run scheduled and serverless from within the service, reporting changes by e-mail.
The script Compare-Cmdlets.ps1 can be downloaded from GitHub here. If you find this useful, would like to comment or have suggestions, use the comments below or leave them on GitHub.