Exchange Deployment & Compliance Assessment


Exchange on‑premises environments remain a critical part of many organizations’ messaging infrastructure. That also makes them frequent audit targets and attractive attack surfaces. Over time, configuration drift, mixed Exchange versions, and evolving security guidance make it increasingly difficult to keep the server compliant, especially in less strict managed environments.

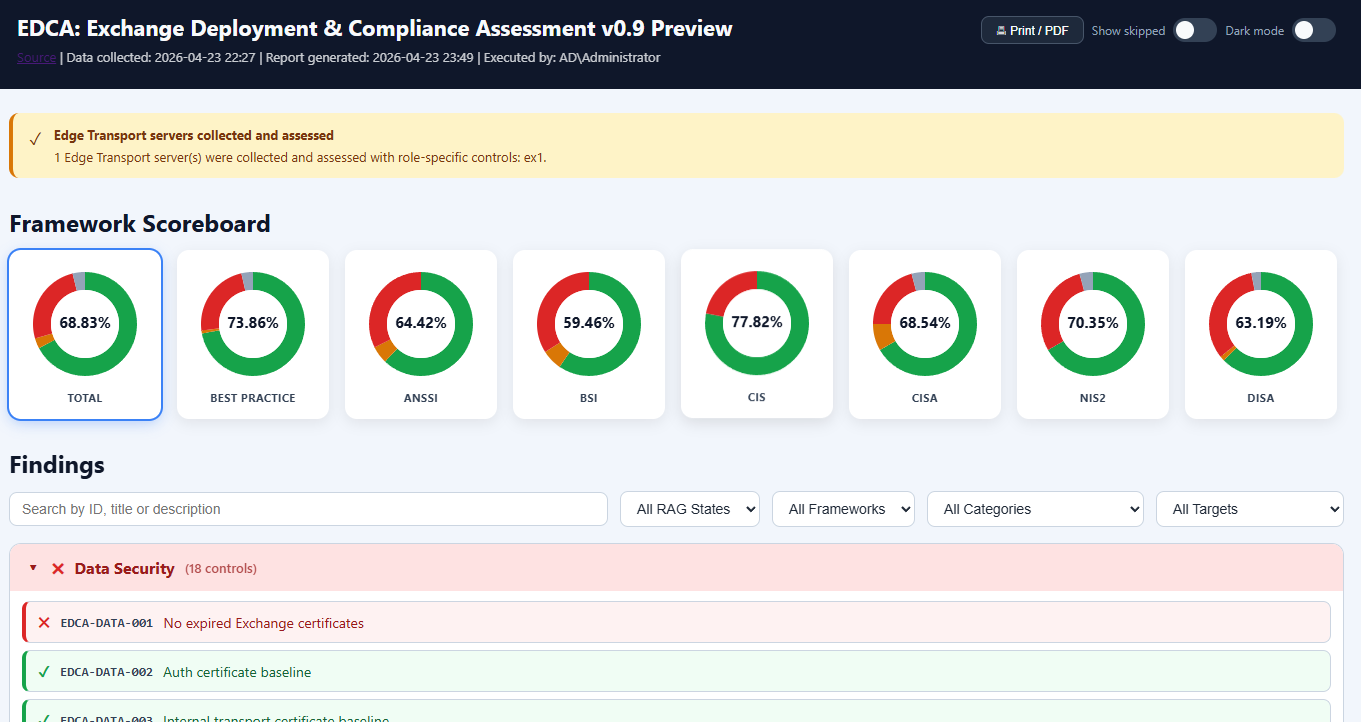
The Exchange Deployment & Compliance Assessment (EDCA) was created to answer that question with evidence. It’s a PowerShell-based assessment tool that collects information from Exchange servers and the Exchange organization. This information is then analyzed and evaluated against best practices and some well-known compliance control frameworks. The result is an (interactive) HTML report that can be used to check and monitor compliance, as well as to review remediation steps for each control. Edge Transport servers can also be added to the analysis; you only need to collect their data separately, as they are usually standalone servers. Their data file can then be added to the other data files to produce a single overview.

Key features

  • Support for Exchange 2016, Exchange 2019, and Exchange Subscription Edition (SE)
  • Evaluate Exchange Server on-premises with Mailbox Server and Edge Transport roles against 7 compliance frameworks, including common Best Practices.
  • Produces an interactive HTML report with framework scoring, with options for filtering and searching.
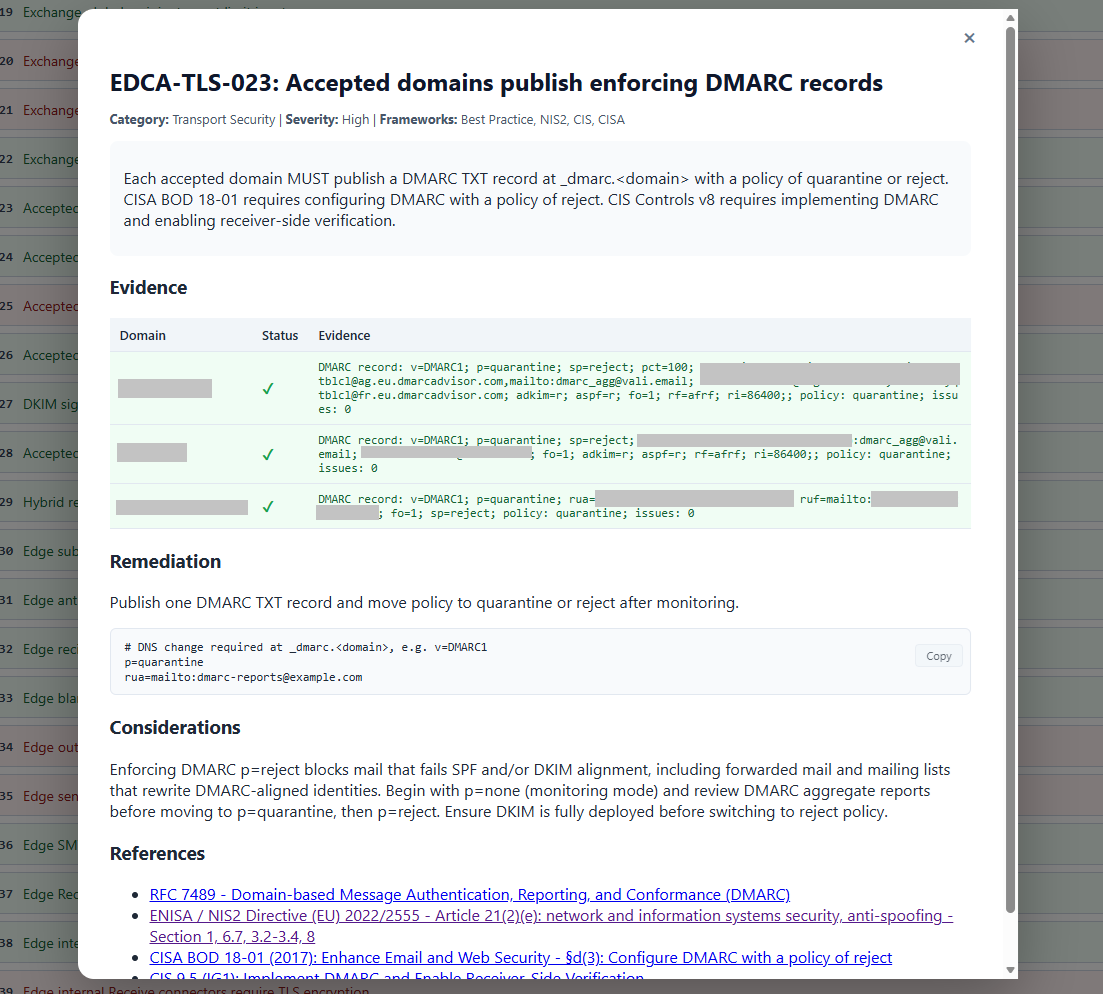
  • Reported controls provide context, impact, and remediation instructions.
  • Option to generate a sample remediation script for failed controls (experimental).

EDCA is read‑only by design, not altering configuration items, changing system state, or automatically applying remediations. Even if controls can be automated (some cannot), the underlying process usually needs to follow a change process that also reviews the impact. The remediation steps or generated remediation script should be treated as a template with reviewable PowerShell sample code.

Usage

To run the EDCA tool, you need:

  • The EDCA.ps1 main file.
  • Config contains the controls information.
  • Modules contains several scripts with helper functions.

Note: You can download the repository via the <> Code option by selecting Download ZIP.

EDCA uses a collection, analysis, and reporting step. These steps are run when you do not specify any additional parameters when calling EDCA:

.\EDCA.ps1

When you run this on a server in an Exchange organization, provided you have sufficient permissions, it will discover all Exchange servers, collect information about Mailbox servers and the Exchange organization, and store this info in the Data subfolder. The generated Report will be stored in a subfolder named Output.

The other parameters of interest are:

  • Local runs against the local Exchange server.
  • Servers run against specified Exchange servers.
  • Throttlelimit will limit the number of Exchange servers being interrogated in parallel.
  • Report produces a Report using data collected or, when Collect is not specified, using info from the Data subfolder.
  • Framework to limit the Frameworks being used to report on.
  • RemediationScript to generate a template to remediate failed controls.

Frameworks

FrameworkOfficial Reference(s)Official URL
Best PracticeCommon best practices for Exchange Server deployments, including CSS Exchange
ANSSI 🇫🇷Mise en œuvre sécurisée d’un serveur Windows
Recommandations de sécurité relatives à TLS
Sécuriser la journalisation dans un environnement Microsoft AD
Transition post-quantique de TLS 1.3
messervices.cyber.gouv.fr
BSI 🇩🇪IT-Grundschutz-Kompendium Edition 2023
Modules: SYS.1.1 · SYS.1.2.3 · APP.2.2 · APP.5.2
bsi.bund.de
CIS 🇺🇸CIS Microsoft Exchange Server 2019 Benchmark
CIS Microsoft Windows Server 2019/2022 Benchmark
CIS Controls v8
cisecurity.org
CISA 🇺🇸Microsoft Exchange Server Security Best Practices Guide
Advisory AA21-062A: Mitigate Exchange Server Vulnerabilities
Binding Operational Directive 18-01
Known Exploited Vulnerabilities Catalog
cisa.gov
DISA 🇺🇸Microsoft Exchange 2019 Mailbox Server STIG
Microsoft Exchange 2016 Mailbox Server STIG
public.cyber.mil/stigs
NIS2 🇪🇺🇳🇱NIS2 Directive (EU) 2022/2555
NCSC-NL TLS Guidelines 2025-05
eur-lex.europa.eu
ncsc.nl

Feedback

EDCA is currently released as a preview. I strongly recommend using it in test or lab environments first, especially while controls, scoring, and reporting continue to tweaked and evolve. Feedback is very welcome. If you encounter issues, have suggestions, or want to propose additional controls or improvements, please use GitHub.

Downloading

The project is open source and available on GitHub at https://github.com/michelderooij/EDCA.

Questions?

The README.MD contains some more details on permission requirements, connectivity requirements, usage examples, and the latest updates.

Unarchiving Mailbox Items


With the introduction of Exchange 2010 at the end of 2009, a native feature was added to Exchange Server for which organizations required 3rd party products before that. The feature which I am talking about is Exchange’s Personal Archives, Online Archives, or In-Place Archiving as it is called nowadays.

Background
Archives were introduced at a time when Office 365 was in its early days, many organizations were running Exchange on-premises with mailbox quotas as bandwidth and storage were limited or relatively expensive. It was up to end users to make sure their mailbox remained within its limits, either by removing either old items, large items or just move them out of their mailbox to those pesky .PST files.

Archives introduced benefits such as lowering disk footprint by taking infrequently used items out of the primary mailbox (which then could only synchronize in full) to the archive, which is basically an additional mailbox for long-term storage. Exchange’s built-in Messaging Records Management (MRM) through retention policies and tags can be used for automatic moving of older items to the archive.

Archives also come with few downsides, especially in the early days. Most notably are perhaps clients not supporting archives at all, or searches not spanning both mailbox and archive. Also, and this is not to be underestimated, end users do not always grasp the concept of archives and the impact on the tasks and tools they use. It’s not uncommon to see people panicking about “missing data” in service tickets, only to discover their “missing data” was moved to their archive by the company retention policy after some digging.

In recent years, I have seen archives becoming less relevant, and organizations adopting the large mailbox concept in favor of lean and mean mailboxes with archives. There are still exceptions of course, usually in the form of substantial – usually shared – mailboxes. For those, staying with Exchange Online archives – and when needed auto-expanding archives – is usually still an option due to the different type of mailbox interaction, or to circumvent Exchange’s storage limitations or Outlook for Desktop’s synchronizing of offline cache files before issues might be seen. The maximum number of items per folder is such a limit, however these have been raised or done away with in recent years. Non-stubbing 3rd party archive solutions taking data out of Exchange can also be a option.

The Problem
Switching to the large mailbox concept creates a problem for those organizations that have already enabled in-place archives for their end users: How to get that data back from those archives to the primary mailbox. While retention policies can move data in opposite direction, there is no such thing as a reverse-retention policy. Also, not every organization would like to instruct end users to unarchive this contents themselves, as it is prone to failure, blocks Outlook for Desktop from doing anything else and might result in abandoned operations which limits future actions as moves are still happening in the background.

When investigating a possible solution I found that there is no other way to accomplish this, than to programmatically move contents from the in-place archive to the primary mailbox. While there is a ‘archive’ operation for mailbox items (which moves it to the assigned Archive folder, not the in-place archive) there is no other single API call to perform this task. Also, the solution would have to use Exchange Web Services, as a limitation in Microsoft Graph makes it incapable of moving messages between multiple mailboxes.

Note: If I overlooked something in this area, please let me know.

Solution
To help organizations accomplish this task, I wrote a PowerShell script which requires the following:

  • Exchange Server 2013 SP1 or later, or Exchange Online.
  • Exchange Web Services (EWS) Managed API 2.21 or later (how to, NuGet package exchange.webservices.managed.api).
  • When using OAuth, the MSAL library is required (NuGet package Microsoft.Identity.Client). Also, you need to have registered an App in Azure Active Directory; the Tenant ID, Application ID and certificate or secret is what you need to provide the script with to operate successfully.
  • In addition to installing the NuGet packages, you can also store the DLLs in the same folder as the script.

Note: Untested with Primary mailboxes on-premises and Exchange Online Archives.

The script Invoke-Unarchive will perform the following tasks:

  • Invoke-Unarchive will move contents from the in-place archive back to the primary mailbox.
  • The most optimal operation will be chosen:
    • Folders present in archive but not in primary mailbox will be moved in one operation.
    • Folders present in archive and primary mailbox are merged. Items in those folders are moved in batches.
    • The same steps are repeated recursively per folder for the whole archive.
  • If, after moving, a folder in the archive is empty, and it is not a non-removable well-known folder, it will be removed.
  • Optionally, Invoke-Unarchive can also move contents stored in the Recoverable Items from the archive to the primary mailbox.
  • Invoke-Unarchive will handle throttling, either by honoring the returned back-off period or by adding delays between operations.
  • Moving items is asynchronous, and Invoke-Unarchive needs to wait for Exchange to complete the previous move to folder X before it can move the next set of items to folder X.

Do not forget to reassign retention policies causing archival, or you might have the run the script again at later moment.

Syntax
The parameters to call Invoke-Unarchive.ps1 are:

  • Identity to specify one or more mailboxes to unarchive items for.
  • Server to specify the FQDN of the Client Access Server to use. When omitted, Autodiscover will be used.
  • IncludeRecoverableItems to instruct the script to process deletions stored in the Recoverable Items as well.
  • Impersonation to use impersonation when accessing the mailbox. When using modern authentication (OAuth), impersonation is mandatory.
  • Force to force moving of items without prompting.
  • NoProgressBar to prevent progress status.
  • TrustAll to accept all certificates including self-signed certificates.
  • TenantId specifies the ID of the Tenant when using a mailbox hosted in Exchange Online.
  • ClientId to specify the Application ID of the registered application in Azure Active Directory.
  • Credentials to specify the Basic Authentication credentials for on-premises usage or against Exchange Online when OAuth is not an option.
  • CertificateThumbprint is the thumbprint of the certificate to use for OAuth. The certificate with the public key needs to stored with the registered application for authentication. The certificate with the private key should be present in the local certificate store.
  • CertificateFile and CertificatePassword to specify the file of the certificate to use. The file shoud contain the private key, and the password to unlock the file can be specified using CertificatePassword.
  • Secret can be used to specify the secret to authenticate using the registered application.

Note that Credentials, CertificateThumbprint, CertificateFile + CertificatePassword and Secret are mutually exclusive.

Example
Below shows an example run against a test-mailbox using modern authentication (OAuth). The common parameter Verbose is used to display additional output.

.\Invoke-Unarchive.ps1 -Identity michel@myexchangelabs.com -Server outlook.office365.com -Impersonation -Secret <Secret> -TenantId <Tenant> -ClientId <AppId> -Verbose
image

You can find the script on GitHub here.

Final Notes
The EWS operation – especially moving items – is not necessarily slow, but against Exchange Online processing large archives can take considerable amount of time due to throttling. When moving a significant number of items using Outlook for Desktop, you will likely run into Outlook abandoning the operation after which you need to wait for Exchange to finish pending moves before you can continue with this task. Using the script, you can take away this unarchiving task from end users by running the operation in the background in one or multiple runs.

Internal Message Classifications visible in Outlook


Ex2013 LogoMessage classifications were introduced with Exchange 2007 which seems like ages ago now. They are a piece of metadata which you can assign to messages, for example the intended audience or sensitivity of messages. These message can then be treated accordingly by the recipient or you can leverage transport rules functionality and Rights Management Services to act on or protect these messages.

Let’s assume you have created a custom message classification using the following cmdlet:

New-MessageClassification –Name ‘InternalUseOnly’ –DisplayName ‘Internal Use Only’ –SenderDescription ‘This message is for internal use only.’

When you retrieve the list of message classifications using Get-MessageClassifications you will notice three additional classifications:

image

Exchange comes with these message classifications which are used by Exchange internally: ExAttachmentRemoved, ExOrarMail and ExPartnerMail. These should not be used by users, let alone be visible. To make them hidden, the PermissionMenuVisible attribute is set to $false for these classifications. This will make them not show up in Outlook WebApp:image

Now, using classifications in Outlook is less admin-friendly and requires exporting of classification information and configuring Outlook to read these classifications from a file. In short, the process described on TechNet TechNet to use message classifications from Outlook is as follows:

From the Exchange Management Shell, run the Export-OutlookClassification.ps1 script from Exchange scripts folder, e.g.

& ‘C:\Program Files\Microsoft\Exchange Server\v15\Scripts\Export-OutlookClassification.ps1’ | Set-Content ‘C:\OutlookClass.xml’

Next, copy the XML file to a location on the client or networked location which is readable by Users. On the client, make the following registry changes:

[HKEY_CURRENT_USER\Software\Microsoft\Office\15.0\Common\Policy]
"AdminClassificationPath"="c:\\Classifications.xml"
"EnableClassifications"=dword:00000001
"TrustClassifications"=dword:00000001

Note: For the purpose of this example the XML is stored as C:\Temp\OutlookClass.xml . Note that “15.0” is for configuring Outlook 2013, replace with 14.0 for Outlook 2010 and 12.0 for Outlook 2007.

Restart Outlook so it will use these settings. When composing a message you will now see the message classification options appear under Options > Permission:

image

Apart from the message classification “Internal Use Only” we created, you will also see that Outlook shows the internal classifications by their display name. That should not be happening.

When you open up the Outlook classifications export file, you will spot that it contains all classifications, including the internal ones:image

So, what you can do now and what the documentation seems to fail to mention, is that after exporting message classifications you may want to remove the internal classifications “Attachment Removed” (ExAttachmentRemoved), “Originator Requested Alternate Recipient Mail” (ExOrarMail) and “Partner Mail” (ExPartnerMail) from the XML export file. Downside is that message with these internal classifications will not display the related description in Outlook, but that should not be an issue and a better option than users being able to select them.

When you have removed the three entries from the XML file and restarted Outlook, the built-in options will no longer be on the permission menu:

image