Update (3sep2022) Updated reflect Azure AD app roles.
Early June, Microsoft released a new PowerShell module for managing Exchange Online. This module got announced at Ignite 2019 already, but it took few months between going into preview end of last year before it finally reached Generally Available status. Usage of this module offers substantial improvements over the existing methods to connect to Exchange Online using Powershell, such as:
Leveraging the PowerShell module ecosystem to install and update the module. This as opposed to the click-to-run Microsoft Exchange Online Powershell Module or connecting through PowerShell remoting.
Support for Multi-Factor Authentication. This is something which the click-to-run module also offers but is not available when using PowerShell remoting.
Robustness. Existing sessions could easily timeout when you took a short break from the console. Or worse, your script could terminate in the middle of execution. This required you to reconnect or forced you to add resilience to your scripts by handling with these disconnects from the back end. The cmdlets of the EXOv2 module should be more robust and resilient.
Introduction of the Graph API support, which should show improvements in terms of speed. Microsoft indicated an 4-8 times improvement should be achievable, but your mileage may vary depending on the operation.
Support for PowerShell 6/7, core,and non-Windows operating systems is coming.
Exchange Online Management v2 module
The module has been baptized EXOv2 to indicate a major change compared to theclick-to-run module (hereafter referred to as EXOv1), and also because it uses Graph API, just like the AzureAD v2 module. The module is available in the PowerShell Gallery, and installation is straightforward. Open a PowerShell 5.1 or later session in elevated mode and run:
Install-Module ExchangeOnlineManagement
The EXOv2 cmdlets which are REST-basedand and leverage Graph API have their nouns prefixed with ‘EXO’, e.g. Get-EXOMailbox. Currently, there are 9 EXO cmdlets in the GA module, as well as few additional ones (more on those later). The regular commands such get Get-Mailbox are available as well after connecting to Exchange Online. This is similar behavior to the EXOV1 module, e.g.
Connect-ExchangeOnline [-UserPrincipalName <UPN>]
When required, satisfy the Multi-Factor Authentication logon process, and you are done. Be advised that the EXOv2 module also supports Delegated Access Permissions (DAP), allowing partners to connect to customer tenants by specifying -DelegatedOrganization <mycustomer.onmicrosoft.com> when connecting.
Also note that apart from the EXO cmdlets, the current module also offers few other interesting commands and helper functions apart from the ones for housekeeping:
Connect-IPPSSession to connect to Security & Compliance center or Exchange Online Protection, depending on licensing. This command was also available in EXOv1.
Get-UserBriefingConfig & Set-UserBriefingConfig. These are a bit out of context, as these commands allow you to enable or disable the Cortana Briefing for users.
IsCloudShellEnvironment indicates if you are running from PowerShell or Azure Cloud Shell, which might be useful in scripts to determine the current context.
The EXOv2 cmdlets and their regular equivalents are shown in the tablebelow:
EXO v1 or Remote PowerShell
EXO v2
Get-Mailbox
Get-EXOMailbox
Get-MailboxFolderPermission
Get-EXOMailboxFolderPermission
Get-CASMailbox
Get-EXOCASMailbox
Get-MailboxFolderStatistics
Get-EXOMailboxFolderStatistics
Get-MailboxPermission
Get-EXOMailboxPermission
Get-MobileDeviceStatistics
Get-EXOMobileDeviceStatistics
Get-Recipient
Get-EXORecipient
Get-RecipientPermission
Get-EXORecipientPermission
What you might notice is the absence of any Set-EXO* cmdlets. This is true, and there is no word yet on if and when Set cmdlets will be introduced. That said, the biggest speed gain is often in bulk retrieval of data, not so much in altering one or more attributes. Until then, do not despair though, as you can pipe output of the EXO cmdlets to their regular cmdlet, e.g.
Get-EXOMailbox michel | Set-Mailbox -EmailAddresses @{Add='michel@myexchangelabs.com'}
This construction will also provide the additional benefit of parallel processing of objects as they pass through the pipeline, but more on that later.
Now comes another thing you should be aware of, and that is that theseEXOv2 cmdlets might not use the same parameter sets as their v1 equivalent. Simply said, you cannot perform a simple Find and Replace operation in your script replacing Get-Mailbox with Get-EXOMailbox to start enjoying benefits of the new module.
When running a cmdlet like Get-EXOmailbox, you might notice that it returns only a subset of the attributes you might expect. Similar to what Properties does for ActiveDirectory module, the EXOv2 module requires you to specify the individual Properties to return. Alternatively, you can use PropertySets to select a predefined set of attributes. For example, Get-EXOMailboxsupports PropertySets such as All, Minimum (default), Policy, Quota and Retention to name a few. When needed, you can combine PropertySets, so something like the following is possible:
Get-EXOMailbox -Identity michel -PropertySets Quota,Policy
A small note on the PropertySet All: Just like Get-ADUser .. -Properties * is considered bad practice as you can impact resource usage and usually return more than what you need, using -PropertySets All for every call is also a bad idea. All is convenient, but make sure you only return the data you need. Be a good person.
To see which EXOv2 cmdlets support PropertySets, use:
Now, I suppose we want to get an indication of the performance enhancements by comparing EXOv2 and equivalent operation using v1 cmdlets. In this simple example we are returning quota information for some 50.000 mailboxes:
In this case, it is not the 4-8x improvement, but more than twice as fast is significant nonetheless. Especially if you are running interactively. To see the impact of parallel processing in the pipeline, we run the following:
As shown, there is a substantial increase in performance, but of course your mileage may vary depending on things like the number of objects, the attributes you require, and any filtering applied. Note that the PropertySet StatisticsSeed used in the example is a very minimal set of attributes which you can use if you only wish the refer to the objects, such as userPrincipalName, primarySmtpAddress and externalDirectoryObjectID.
Speaking of filtering, one would expect that server-side filtering (-Filter) would show an improvement in terms of speed over client-side filtering (Where), as filtering at the source is far more efficient in terms of result set and data to send over. However, it seems that due to the nature of a shared environment, sending superfluous data over the wire is less of a penalty than local filtering. Of course, your mileage may also vary here, so experiment what works best for your situation. Also, not every attribute is supported for filtering with these EXO cmdlets, which lies in how Graph exposes data. More information on that here.
When your session times out or disconnects, you will see that the module tries to reconnect your session; something which you would have to programmatically solve for the v1 module or regular remote PowerShell:
Certificate-based Authentication
Exchange administrators often have a requirement to run unattended scripts against Exchange Online, for example scheduled reports or as part of another process. In the past, this lead to setups where service accounts and stored credentials were used. Later this was improved by the ability to apply Conditional Access to limit these logons to on-premises infrastructure.
The problem with Multi-Factor Authentication is that it requires interaction with end-user to approve the sign-on. Of course, while your token is still valid, you can easily (re)connect to Exchange Online just by providing the Username Principal Name, which will reuse the token if it didn’t expire. But all in all, these solutions are high maintenance, and far from ideal from a security perspective.
Here comes certificate-based authentication, which is supported in version 2.0.3 and up of the EXOv2 module. In short, certificate-based authentication allows you to log on to Exchange Online using:
PowerShell
EXOv2 module
A (self-signed) certificate containing private key
Enterprise App registration in Azure Active Directory which contains the public key of this certificate, and proper assigned Azure AD role(s).
Note: Enterprise app registration may require Azure AD P1/P2 license.
To install the EXOv2 2.0.3 version of the module (preview at time of writing), use:
Note that it might complain if you have the GA version of the module installed, in which case you need to uninstall the GA module first, or you can install them side-by-side by specifying -Force.
Next, we need to create a self-signed certificate. To accomplish this, we can use the script published here. To create the certificate, simply use:
Note that you need to provide a password to protect the PFX file containing the private key. Also do not forget to import the PFX in your local certificate store. When importing, you can mark the certificate as non-exportable, which prevents admins to transfer the certificate to other systems.
After importing, you can check for the certificate’s presence using:
Get-ChildItem Cert:\CurrentUser\My | Where {$_.Subject -eq 'CN=EXOv2'}
The Subject should be the CommonName you used when generating the certificate. The thumbprint of our certificate is 49A4A73B4696718676770834BCD534DE35030D2C. We are going to use this later on to connect.
Now we need to set things up in Azure Active Directory:
Open up the Azure Active Directory Portal, and navigate to Active Directory.
Select App registrations, and click New registration.
Give the App a meaningful Name, and select Accounts in this organizational directory only. Set Redirect URI to Web and leave the URL blank. Then, click Register.
Note that our App has been assigned an Application (Client) ID. Make note of this value, as we will need it to connect later on.
Next, we need to configure the App permissions. Select API permissions. User.Read should show up as default. Click Add a permission, and locate Office 365 Exchange Online from the APIs my organization uses tab. Select Application permissions, and in the next screen expand Exchange and check Exchange.ManageAsApp. We are done here, so click Add permissions.
Only thing left now is to Grant admin consent, which can be done by clicking Grant admin consent for <tenant>. When done, the Status column for Exchange.ManageAsApp permission should have changed to Granted for <tenant>.
Now we need to associate this App with out certificate. Select Certificates & Secrets, and click Upload certificate. Pick the certificate file which we generated earlier, and select Add.
Laststep is to assign the App one of the built-in Azure AD roles.Go to the Azure Active Directory blade, and selectRoles andadministrators. To manage Exchange Online using PowerShell, you need to assign the Exchange Administrator role; for Security & Compliance, you can assign the Compliance Administrator role.
Select the desired role(s), and click Add assignments in theassignments overview screen. Note that when picking security principals, theApp might not show up initially, and typing its first few letters might help. Click Add to assign therole.
Note that the UserName mentioned in the overview is the Application ID.
Now we are done configuring the back end, we can look again at connecting. This should now be as simple as running:
CertificateThumbprint is the thumbprint of the self-signed certificate you created earlier.
AppID is the Application (Client) ID of the registered App.
<tenant>.onmicrosoft.com the initial domain name of your tenant.
Note that you can also connect specifying the CertificateFile instead of Thumbprint, but then you need to provide the password as well via CertificatePassword. Having the certificate in the certificate store of the administrator account or account running the task and just specifying the thumbprint is more convenient and requires zero interaction.
If all steps above were followed correctly, you should now be connected to Exchange Online, without anyMFA interaction.
A final note is that Connect-IPPSSession mentioned earlier does not support certificate-base authentication.
What about other Workloads
You can use the same certificate-based authentication to connect to several other workloads as well. That is, provided you have installed the required PowerShell module and the Azure AD role you assigned to the Application has adequate permissions. You can use the commands below to connect to these workloads. A small note that the commands to connect may use a different parameter names for AppId or Organization, e.g. AppId, ApplicationId or ClientId and Organization and TenantId are same things in the examples below.
The logons which are performed in the context of the Application are viewable in the Azure Sign-Ins at https://aka.ms/iam/rtsp
Note that this view is currently in preview, and there might be a slight delay before logon shows up.
Final Notes
It would be nice if there would be a way to incorporate Exchange granular Role-Based Access Control model into the permissions model. Granting Apps only the built-in Azure AD roles is somewhat limiting, and it would be nice to restrict accounts in only being able to run the cmdlets and parameters they need to use.
When running Exchange cmdlets, you will find these in the audit log but with the <tenant>\AppID as UserName. Therefore, best thing to do is to use a single App registration for each individual administrator or process, instead of using a single App registration and multiple certificates.
And finally, it would be nice if the various teams would align their cmdlet and parameter naming schemes for consistency.
With great honor and joy I can announce that I have been awarded the Microsoft Most Valuable Professional award for the seventh consecutive year, again in the category Office Apps & Services. Congratulations to other new and re-awarded MVPs as well, and kudos to the MVP program in undertaking the monstrous task of reviewing and evaluating thousands of contributions every award cycle.
With another award cycle also comes the time to have a look at the MVP statistics. Below numbers are taken from the public MVP site. July 3rd is chosen as the first days the site gets updated and new awardees need to turn in their NDA before they show up on the site.
Because people can get awarded each month, the comparison to July 3rd of every year indicates only yearly trend. Therefor we’ll also compare the numbers to those of June to see the impact on long-term MVP population, as awardees from January are only up for consideration in July 2021 for example.
From the numbers, it is clear that this cycle the number of MVPs went a bit down from 2.998 in June 2020 to 2.850 now (-5%), but it is higher than the 2.634 (+8%) of July 2019.
The following table contains the changes per award category from July 2019 and June 2020 to July 2020. I will leave the interpretation up to you.
Expertise
July 2019
June 2020
Change
July 2020
Change
Cloud and Datacenter Management
232
242
4%
209
-10%
Microsoft Azure
409
455
11%
463
13%
Office Apps & Services
491
530
8%
512
4%
Business Applications
166
234
41%
240
45%
Data Platform
332
375
13%
358
8%
Developer Technologies
644
742
15%
697
8%
Enterprise Mobility
106
119
12%
113
7%
AI
84
109
30%
122
45%
Office Development
47
60
28%
64
36%
Windows Development
119
123
3%
110
-8%
Windows and Devices for IT
57
55
-4%
43
-25%
Total Awards
2687
3044
13%
2931
9%
Total MVPs
2634
2998
14%
2849
8%
Note: The total number of MVPs doesn’t equal the total number of awardees, as MVPs can be awarded in more than one category; there are now 82 people awarded in multiple categories’; an increase of 57% compared to June 2019.
When zooming in on the Office Apps & Services category, the awards per country are shown below, including change compared to last year. Be advised that 26 OAS MVPs are anonymous or have profiles without information on residency.
Country
Number
Country
Number
Country
Number
Australia
24 (20%)
India
13 (0%)
Saudi Arabia
1 (0%)
Austria
3 (0%)
Ireland
1 (0%)
Serbia
1 (0%)
Belgium
5 (-38%)
Israel
1 (0%)
Singapore
3 (0%)
Bosnia and Herzegovina
1 (0%)
Italy
5 (-17%)
Slovakia
1 (0%)
Brazil
8 (-20%)
Japan
20 (-10%)
Slovenia
2 (0%)
Bulgaria
2 (0%)
Korea
12 (0%)
South Africa
4 (-20%)
Cambodia
1 (100%)
Luxembourg
1 (100%)
Spain
12 (50%)
Canada
33 (6%)
Macedonia, FYRO
2 (0%)
Sri Lanka
1 (0%)
China
17 (6%)
Malaysia
1 (0%)
Sweden
9 (80%)
Colombia
5 (25%)
Mexico
5 (0%)
Switzerland
3 (50%)
Croatia
5 (25%)
Myanmar
1 (100%)
Taiwan
4 (0%)
Czech Republic
2 (0%)
Nepal
1 (0%)
Thailand
2 (-34%)
Denmark
6 (0%)
New Zealand
6 (0%)
The Netherlands
22 (4%)
Egypt
1 (0%)
Nigeria
2 (100%)
Turkey
2 (0%)
El Salvador
1 (0%)
Norway
6 (0%)
Ukraine
2 (0%)
Finland
4 (33%)
Pakistan
1 (-50%)
United Arab Emirates
1 (-50%)
France
18 (-10%)
Poland
6 (50%)
United Kingdom
33 (17%)
Germany
24 (-4%)
Portugal
3 (50%)
United States
123 (2%)
Hungary
2 (0%)
Russia
9 (12%)
Uruguay
1 (0%)
And last, the number of Office Apps & Services and total number of MVP’s over the last years, before and after the award cycle.
June 2017
July 2017
June 2018
July 2018
March 2019
July 2019
June 2020
July 2020
OSS
532
449
490
383
622
491
530
512
-16%
9%
-22%
62%
-21%
8%
-3%
Total
4134
3490
3815
3030
3205
2634
2998
2849
-16%
9%
-21%
6%
-18%
14%
-5%
On a final note, the above data is static; some MVPs have build great dashboards which allow you to work with the data more interactively (if they have updated their data set, that is). Some noteworthy mentions:
Update 22feb2021: Added note about enabling SMTP Authentication.
Not too long ago, the Exchange product group enabled Modern Authentication (or OAuth2) support for IMAP and SMTP in Exchange Online, and shortly after for POP3 as well. This support was much needed with the imminent deactivation of Basic Authentication. With Modern Authentication available, vendors, developers as well as organizations running custom scripts are given time to adopt Modern Authentication where applicable.
By delaying the original end date of Basic Authentication from October 13, 2020 to Q3’ish 2021 due to the Corona situation, the adoption period is increased significantly. That does not mean however developers and organizations can sit back and relax: Act sooner rather than later, the end of Basic Authentication is nigh.
The benefits of Modern Authentication are of course that it is a more secure model (e.g. resistant to password spray attacks), as well that it can leverage Microsoft 365 functionality like Conditional Access to limit protocols to certain locations.
That said, in this article I will show you how to approve usage of a popular 3rd party e-mail application Thunderbird, using IMAP protocol in conjunction with the Modern Authentication scheme. The procedures below have been run against Thunderbird 78.0b4 on Windows as well as Ubuntu.
Third Party Applications Before we move on to Thunderbird, we first make sure the organization settings allow for third party applications to access your mailbox Exchange Online. This process has been blogged about for common popular applications, such as the native iOS Mail app or the Gmail app on Android. So, how to go ahead if your organization restricts access to third party applications, and they only want to allow specific applications, which is of course good practice.
The easiest way to add Thunderbird to the allowed applications and grant consent to the organization, is by constructing an admin consent URL. To construct the consent URL, take the following URL:
Replace <TenantID> with your Tenant ID. This piece of information can be found under the Azure Active Directory blade in the Azure portal.
Replace <AppID> with the Application ID (sometimes also referred to as Client ID) of the application you want to provide consent for. As we can see in the table below, the ID of Thunderbird is 08162f7c-0fd2-4200-a84a-f25a4db0b584.
Application
ID
Thunderbird
08162f7c-0fd2-4200-a84a-f25a4db0b584
Gmail app
2cee05de-2b8f-45a2-8289-2a06ca32c4c8
iOS Accounts (Apple Mail app)
f8d98a96-0999-43f5-8af3-69971c7bb423
Open your browser, and visit this URL as an administrator. You will be greeted with a consent form, in which you will be asked to accept for your organization. Because the redirect_uri is empty here, you will likely be send to a non-existing location after giving consent, but that’s OK.
When you look at the Enterprise Applications blade in the Azure Portal, you will notice the Thunderbird app has been added. Here you can further customize it, like any enterprise application supporting Modern Authentication, e.g.
Restrict access to specific users or groups.
Use Conditional Access to restrict access to certain locations.
Another thing to note is that permissions for Thunderbird app will have been translated to the following Graph permissions:
API
Permission
Type
Microsoft Graph
Read and write access to mailboxes via IMAP.
Delegated
Microsoft Graph
Read and write access to mailboxes via POP.
Delegated
Microsoft Graph
Read and write access to mailboxes via SMTP AUTH.
Delegated
Microsoft Graph
Sign in and read user profile.
Delegated
We should now be ready on the back-end.
Thunderbird Now as an end user, start Thunderbird. Do not start configuring the account yet, as we first need to modify a Thunderbird setting to allow for successful Modern Authentication through a browser popup. Click the ‘hamburger’ menu to open the Options window. Scroll all the way down, and open the Config Editor. Click ‘I Accept the risk’. In the settings overview, set General.UserAgent.CompatMode.Firefox setting to True:
Preference Name
Status
Type
Value
general.useragent.compatMode.firefox
modified
boolean
True
Close the Config Editor and Preferences tab. We can now set up our account in Thunderbird.
Select Add Mail Account, and enter your name and e-mail address. You can leave the password empty, as we will be using an Oauth token which we will retrieve later on. Press Continue to have Thunderbird figure out where your mailbox is hosted. When it properly discovers the mailbox location, it will set the configuration as follows:
If Thunderbird can’t figure out your settings (for some reason the Windows build could, but the Ubuntu build couldn’t), configure them as indicated above. We can’t select OAuth2 for authentication here, so leave Authentication as is; we will correct this right after we click Done.
Note: Configure manually would be the place you expect to set authentication to OAuth2 straight away, but with the build we used, the OAuth2 option is not available from the manual account setup dialog. Therefore, we need to set up the account and correct settings afterwards.
In the Server Settings window related to your account, select OAuth2 authentication:
In the Outgoing Server (SMTP) settings, select Offic365 (Microsoft) – smtp.office365.com, click Edit and set authentication for outbound SMTP to OAuth2 as well. Note: The Thunderbird build running on Ubuntu doesn’t provide the OAuth2 authentication option for SMTP.
When finished, click ‘Get Messages’. The familiar Microsoft 365 authentication browser dialog should show up. After signing in, the next question will be to grant consent to the Thunderbird application to it can access your mailbox data and send e-mail:
Note that this dialog can not be suppressed, as currently only interactive applications are supported. If you are working on an app or script which needs unattended access, please use Graph API.
After the user provides consent, Thunderbird is ready and will start fetching your default folders and mail items. If you want to view additional folders, you need to subscribe to them by right-clicking the account and picking Subscribe. Only folders with mail-items are supported, despite you can select every folder in your mailbox including Calendar or Contacts.
Note: If you encounter problems sending messages, please check the CASMailbox setting SmtpClientAuthenticationDisabled. If it is set to $true, you need to disable it to enable SMTP authentication, e.g.
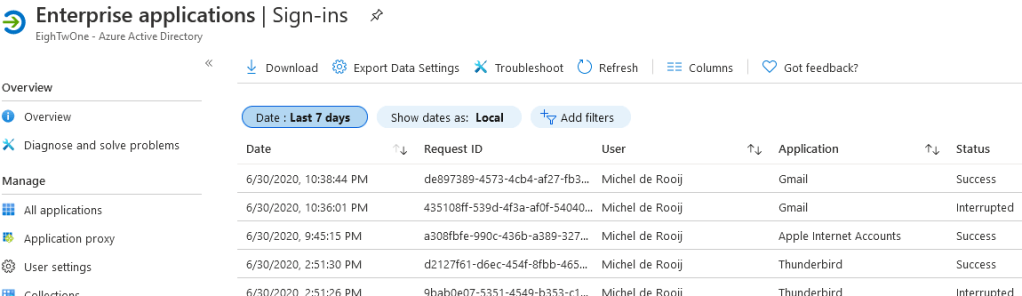
Logging If you have people in your organization requiring some form of proof that Modern Authentication is being used, you can use the Enterprise Applications / Sign-Ins view from the Azure Active Directory portal.
Alternatively, you can use Thunderbird’s built-in logging capabilities. To accomplish the latter, set the following environment variables before starting Thunderbird:
The Exchange Team released the quarterly Cumulative Updates for Exchange Server 2019 as well as Exchange 2016. Like the previous two Cumulative Updates, these require .NET Framework 4.8.
Apart from fixes as well as security updates included from the previous CU, these update contain the following changes for both builds:
Added additional file types to default OWA Mailbox Policy for Blocked File Extensions. More information in KB4559446.
Added support to Restore-RecoverableItems for easier usage. More details in KB4547707.
Links to the updates as well as a description of changes and fixes are described below.
4559441 Foreign language characters set in RejectMessageReasonText of a transport rule aren’t shown correctly in Exchange Server 2019
4547707 Enable piping for Restore-RecoverableItems in Exchange Server 2019
4549689 HMA EvoSTS certificate rollover causes authentication prompts due to stalled key on worker process spawn (warmup phase) in Exchange Server 2019
4559446 Changes to Outlook on the web blocked file extensions and MIME types in Exchange Server 2019
4559440 Export to a PST for an eDiscovery search fails Exchange Server 2019
4559439 EAS creates failure report if a message with unknown recipients is in Drafts in Exchange Server 2019
4559442 2080 Events caused by empty values in HKLM\SYSTEM\CurrentControlSet\Services\MSExchange ADAccess\Instance0 in Exchange Server 2019
4559438 Edge Transport server hangs in Exchange Server 2019
4559443 Managed Folder Assistant fails with Event ID 9004 NotInBagPropertyErrorException in Exchange Server 2019
4559437 PR_RECIPIENT_ENTRYID is computed if no email address or type in Exchange Server 2019
4559444 Conversion from HTML to RTF removes non-breaking space in Exchange Server 2019
4559436 Attachments with properties (like Azure Information Protection labels) not always matching in Exchange Server 2019
4559435 Introduce an OrganizationConfig flag to enable or disable recipient read session in Exchange Server 2019
Exchange 2016 CU17 fixes:
4559444 Conversion from HTML to RTF removes non-breaking space in Exchange Server 2016
4559435 Introduce an OrganizationConfig flag to enable or disable recipient read session in Exchange Server 2016
4547707 Enable piping for Restore-RecoverableItems in Exchange Server 2019 and 2016
4559436 Attachments with properties (like Azure Information Protection labels) don’t always match in Exchange Server 2016
4559437 PR_RECIPIENT_ENTRYID is computed if no email address or type in Exchange Server 2016
4559438 Edge Transport server hangs in Exchange Server 2016
4559439 EAS creates failure report if a message with unknown recipients is in Drafts in Exchange Server 2016
4559440 Export to a PST for an eDiscovery search fails in Exchange Server 2016
4559441 Foreign language characters set in RejectMessageReasonText of a transport rule aren’t shown correctly in Exchange Server 2016
4559442 2080 Events caused by empty values in HKLM\SYSTEM\CurrentControlSet\Services\MSExchange ADAccess\Instance0 in Exchange Server 2016
4549689 HMA EvoSTS certificate rollover causes authentication prompts due to stalled key on worker process spawn (warmup phase) in Exchange Server 2016
4559443 Managed Folder Assistant fails with Event ID 9004 NotInBagPropertyErrorException in Exchange Server 2016
4559446 Changes to Outlook on the web blocked file extensions and MIME types in Exchange Server 2016
Notes:
These Cumulative Updates do not contain schema changes compared to their previous Cumulative Update.
When upgrading from an n-2 or earlier version of Exchange, or an early version of the .NET Framework, consult Upgrade Paths for CU’s & .NET.
Don’t forget to put the Exchange server in maintenance mode prior to updating. Regardless, setup will put the server in server-wide offline mode post-analysis, before making actual changes.
When using Exchange hybrid deployments or Exchange Online Archiving (EOA), you are required to delay installing at most one version (n-1).
If you want to speed up the update process for systems without internet access, you can follow the procedure described here to disable publisher’s certificate revocation checking.
Cumulative Updates can be installed directly; no need to install RTM prior to installing Cumulative Updates.
Once installed, you can’t uninstall a Cumulative Update nor any of the installed Exchange server roles.
The order of installation shouldn’t matter with the “every server is an island” concept, yet recommended is to upgrade internet-facing, non-internet-facing servers first, followed by Edge Transports.
Caution:
As for any update, I recommend to thoroughly test updates in a test environment prior to implementing them in production. When you lack such facilities, hold out a few days and monitor the comments on the original publication or forums for any issues.
With the emergency to facilitate working from home due to the Corona pandemic, many organizations were faced with a dilemma. When running Exchange 2013 or some even Exchange 2010 on-premises, and a desire to start using Microsoft Teams, organizations were confronted with the following requirements for integrating Microsoft Teams with Exchange on-premises (source):
Users with mailboxes hosted on-premises must be synchronized to Azure Active Directory.
Running Exchange 2016 Cumulative Update 3 or later on-premises.
OAuth needs to be configured (via Hybrid Configuration Wizard, or manual as MVP fellow Jaap blogged about here).
Recently, an additional requirement was added to explain that for delegates to schedule calendar meetings on behalf of another person, some additional steps are required (steps 2-3 mentioned here).
Now as you might know, Exchange 2010 does not support OAuth authentication. But, by putting Exchange 2016 in front of Exchange 2010, Exchange 2016 can be used for dealing with OAuth authentication, as well as dealing with client traffic as it can down-level proxy to Exchange 2010 for mailboxes hosted on those servers. Looking at these requirements, organizations might conclude that putting Exchange 2016 CU3 in front of their Exchange environment, and configuring OAuth would suffice the requirement to integrate Teams with their Exchange on-premises environment.
Alas, the additional requirement for full Teams integration is that the mailbox server hosting the mailbox should support REST API. Teams leverages Graph REST API calls to interact with mailboxes. In an Hybrid Exchange setup, on-premises mailboxes are identified, and related REST API calls will be directed at the on-premises REST endpoint, landing on your Exchange environment. The requirement for REST API support is something which is not explicitly stated in the Teams integration article, despite my earlier pull request.
It is however stated implicitly in an article on REST support in Hybrid Exchange or the original publication on REST API support in Exchange 2016 CU3 by the Exchange PG, two articles which you might easily have missed or forgotten about. Either way, it states that “All on-premises mailboxes that will use the REST APIs must be located on databases located on Exchange 2016 CU3 servers”.
Thus, with REST API support only being available per Exchange 2016 CU3, Teams will not fully integrate with mailboxes hosted on earlier versions of Exchange. Exchange 2016 can be used to offload OAuth when your mailbox is still on Exchange 2010 (which works fine for Exchange Web Services for Free/Busy, for example), but Exchange 2010 does not support REST API, and thus will never understand those ‘weird’ (proxied) requests landing on /api virtual directory, typical of REST API calls. Consequently, you will see AutodiscoverV2 and REST API calls greeted with a 404:
Typically, first thing users usually will notice missing is the Calendar integration:
Knowing this, the assumption could be that this combination doesn’t work at all, but as often the truth lies somewhere in the middle. You can use Teams when mailboxes are still hosted on pre-Exchange 2016 CU3, if you can live with the limitations. Below I have included a short overview of these, or other noteworthy items. The information is complementary to the How Exchange and Teams interact article. I hope it may help in discussions on what works and what doesn’t.
Disclaimer: Validated with mailbox hosted on Exchange 2010 with Exchange 2016 in front, OAuth and SkypeOnline AppId configured, and using Outlook 2016 C2R. Information may be subject to change. The list may not be conclusive; if you have any additional observations, please leave them in the comments.
Actions
Works
Comment
Create & View Meetings in Teams
No
No Calendar integration as this requires Outlook Calendar REST API. Visual clue is absence of the Calendar button.
Modify User Photo in Teams (client)
No
Doesn’t work when mailbox is hosted in Exchange on-premises.
Call History
Yes
History propagates to mailboxes hosted in Exchange on-premises in ‘Teams Calls’ folder.
Access Outlook Contacts
No
Works only with Exchange Online mailboxes.
Voicemail
Yes
May use & receive voice-mail, but can’t play from Teams.
Free/Busy status
Yes
Uses EWS.
Create & View/Update Teams Meetings from Outlook
Yes
Using default Teams Meeting add-in.
Create Teams Meetings from Outlook as Delegate
No
Teams Scheduler uses AutodiscoverV2 to discover delegate EWS endpoint, and fails. Outlook will display “Sorry, but we can’t connect to the server right now. Please try again later.”
View/Update Teams Meetings from Outlook as Delegate
Yes
EWS is used to fetch and update the calendar item.
MailTips in Teams
No
MailTips like Out of Office are not shown in Teams. MailTips work for Exchange 2016 CU3+.
Create & View Channel Meetings in Teams
No
Doesn’t work when mailbox is hosted in Exchange on-premises.
Share to Teams
No
Doesn’t work when mailbox is hosted in Exchange on-premises.
Of course, the better experience is to be had when your mailbox is hosted on Exchange 2016 CU3 or later (including Exchange 2019), or best when you simply host them in Exchange Online. However, given the circumstances and pressure from the organization to use Teams, that route might not be an option for everyone. Organizations may look at substantial investments in time and resources. In those cases, it might be good to know of alternative less preferable scenarios, and more important, any possible limitations you might encounter when taking a shortcut.


![clip_image013[4]](https://eightwone.com/wp-content/uploads/2020/08/clip_image0134_thumb.jpg "clip_image013[4]")

![clip_image017[4]](https://eightwone.com/wp-content/uploads/2020/08/clip_image0174_thumb.jpg "clip_image017[4]")
![clip_image019[4]](https://eightwone.com/wp-content/uploads/2020/08/clip_image0194_thumb.jpg "clip_image019[4]")


![clip_image001[14]](https://eightwone.com/wp-content/uploads/2020/07/clip_image00114_thumb.png "clip_image001[14]")

![clip_image001[18]](https://eightwone.com/wp-content/uploads/2020/07/clip_image00118_thumb.png "clip_image001[18]")


![clip_image001[14]](https://eightwone.com/wp-content/uploads/2020/07/clip_image00114.png "clip_image001[14]")

![clip_image001[18]](https://eightwone.com/wp-content/uploads/2020/07/clip_image00118.png "clip_image001[18]")


