The MTA-STS policy (MTA Strict Transport Security) is to prevent Man-In-The-Middle attacks by publishing authorized mail servers and prevent TLS downgrade attacks (Opportunistic TLS), when both parties support MTA-STS. MTA-STS is easier to implement over DANE with DNSSEC, which is expected to get inbound support in Exchange Online next year. Since I am using WordPress to host this blog, I was looking for ways to host the policy file for MTA-STS at the required location, as hosted WordPress does not offer this possibility.
There is documentation describing how to accomplish this using, for example, Azure Static Web Sites, but this requires an Azure subscription. There are also 3rd parties offering hosted MTA-STS, which are usually not free.
Then I stumbled upon the possibility of using a custom domain with GitHub pages, which can be used for this. So, here is a quick write-up on how to host your MTA-STS policy file on GitHub using GitHub Pages. This process could also be used when needed for hosting other files on GitHub.
Hosting MTA-STS Policy using GitHub Pages
Start by creating a new repository in GitHub. You can name it anything you want, but for the sake of the example, I called it mta-sts. Make sure it is public.
Next, we must create an empty file called .nojekyll in the repository. This file will instruct GitHub not to build pages, and just serve your files. So, Add file > Create new file, enter .nojekyll as Name your file and Commit changes.
Now, create the policy file that needs to be named mta-sts.txt in the .well-known folder file, select Add file > Create new file and enter .well-known/mta-sts.txt as the name of your file. This will also create the required folder. In the contents field, paste your policy. For example, the MTA-STS policy file when using only Exchange Online for receiving e-mail could look something like this:
When done, commit your changes to store the policy file on GitHub. For more information on the MTA-STS policy file definition, click here.
Next, we need to enable GitHub Pages for this repository. Go to Settings, and select the Pages tab. Under Branch, select the branch you want to publish, eg. main, and press Save. Note that GitHub Pages are served using a valid 3rd party certificate, which satisfies one of the requirements for MTA-STS.
New options should now appear on the GitHub Pages settings, one of which is Custom domain. If you decided to use a custom domain in the previous step, enter it here, eg. mta-sts.contoso.com, and click Save.
GitHub will start to check DNS for the presence of this domain. Time to head over to your ISP portal, and create the required records in DNS.
First, if you used a custom domain for hosting the MTA-STS policy, create a CNAME mta-sts record for your domain pointing to <user>.github.io or <org>.github.io, e.g.
mta-sts.contoso.com CNAME 3600 user.github.io
Next, create the DNS TXT _mta-sts record to indicate MTA-STS support, e.g.
Note that you need to update ‘id,’ usually with timestamp yyyymmddhhmm, whenever you make changes to the policy. This indicates to MTA-STS supporting hosts there has been a change on your end.
You are now set. After DNS some time for DNS to propagate changes, you can start verifying your configuration by browsing https://mta-sts.contoso.com/.well-known/mta-sts.txt, which should return your policy file without any certificate prompts. You can verify DNS and policy access using websites like MxToolbox or PowerDMARC. The example below was generated using EasyDMARC:
TLS Reporting
In addition to setting up MTA-STS, you can configure TLS Reporting (TLS-RPT). This will instruct supporting servers to report on TLS usage and mention certificate issues, for example. Note that these are reports on inbound messages, whereas Exchange Online offers information on outbound TLS usage. To set up TLS-RPT, configure a DNS TXT record _smtp._tls and specify a recipient for these reports, e.g.
The rua field contains the e-mail address where reports should be sent. You can process these reports in JSON format yourself or have one of the 3rd parties offering this service do this for you. The example below is generated by Dmarcian.
Updated: 1.2 adds default ExchangeOnlineManagement cmdlets scanning and authentication options.
Since the original announcement on deprecation of Basic Authentication, organizations had time to analyze their environment which may include Exchange-related procedures and tools. These usually also contain scripts or commands, which depend on the Exchange Online Management module. A previous blog on its history and how version 2 of this module lends itself for unattended operation with certificate-based modern authentication support can be found here.
The initial release of the Exchange Online Management v2 – or EXOv2 – module offered a an additional small set of cmdlets which utilized REST-based services. Apart from the functional discrepancies, such as having to specify a property set to indicate which properties to return, the big advantage of these added commands was that they did not depend on the Windows Remote Management (WinRM) client using Basic Authentication for token exchange. Disabling Basic Authentication on WinRM client lead to messages such as:
Connecting to remote server outlook.office365.com failed with the following error message : The WinRM client cannot process the request. Basic authentication is currently disabled in the client configuration.
This dependency makes it challenging for organizations to turn off Basic Authentication altogether, or lead to problems when they did. Fast forward to the present, where the Exchange Online Management module in its current release is offering nearly all Exchange cmdlets in REST-based form, with full functional parity.
While I expect Microsoft to reach full command parity before they flick the Basic Authentication switch to off, there are also other use cases for which analyzing scripts might be helpful:
Ths initial purpose was identifying commands which require RPS (Remote PowerShell), and thus thus require WinRM Basic Authentication enabled. Because the Exchange Team did an amazing job in catching up in the recent months, only few Exchange Online cmdlets are still lacking REST support in my tenant at this moment, e.g. New-ApplicationAccessPolicy. But then again, your mileage may vary, as the recent Preview 7 module removed few UnifiedGroup related cmdlets which had issues.
New Exchange Online commands may not receive immediate REST support.
Organizations might want to cross-reference commands with scripts.
Identifying Exchange Online commands and parameters in scripts helps in determining the minimum set of permissions required to run the script.
To analyze and report on Exchange Online scripts, I created a simple script Analyze-ExoScript.ps1. This script, which is available on GitHub here, does the following:
Connect to Exchange Online using RPS and inventory the commands available. Note that this requires the UseRPSSession switch when connecting, which is only available per 2.0.6-Preview3 of the module. If your organization only runs GA versions of the module, this script cannot be used.
Connect to Exchange Online using REST and inventory the commands available. It will re-use the account used for authenticating the RPS session, which should prevent receiving another authentication dialog or MFA challenge.
Cache cmdlet information in an external file to prevent having to connect to Exchange Online for every run. The file is named EXO-CmdletInfo.xml and will be stored in the same folder as the script.
Process the script and report on the Exchange-related commands used.
Usage Calling Analyze-ExoScript is straightforward:
File is the name of one or more files which you want to analyze. Note that the script accepted pipeline output, so you can also feed it filenames using Get-ChildItem for example.
The ShowAll switch tells the script to output all found commands, not only the Exchange ones.
The switch Refresh tells the script to ignore saved command information, trigger reconnecting to Exchange Online in order to refresh the command sets.
Credential specifies the (Basic Authentication) credential to pass to Connect-ExchangeOnline.
Organization and AppId can be used to specify the tenant ID (x.onmicrosoft.com) and registered application ID to use with Connect-ExchangeOnline using Modern Authentication. This also requires one of the following:
CertificateThumbprint of the certificate to use for authentication.
CertificateFile of the file containing the certificate to use, together with CertificatePassword to specify its password.
When asked to authenticate, make sure your role has the necessary Exchange-related permissions as that will determine the Exchange Online cmdlets available to you, and consequently also the commands which Analyze-ExoScript will recognize in scripts to process.
For example, to process a script Fix-MailboxFolders.ps1, use:
The output consists of objects, which allow for further filtering:
The returned properties are:
Command is the Exchange Online command identified
Type will tell you if the command supports REST or requires RPS.
Parameters are the parameters used together with the command. This includes common parameters, which might be less usable for role assignment purposes.
Alt contains alternative REST-based cmdlet you could consider using for performance reasons, e.g. Get-EXOMailbox instead of Get-Mailbox.
File and Line are the file containing the command and on which line it is located.
AST To analyze code, I leveraged PowerShell feature called Abstract Syntax Tree, which was an interesting exploration in itself. PowerShell AST can be used to decompose PowerShell code into tokens. This is way better than simply looking for strings, and does away with having to interpret code yourself to see if something is a command, comment or just some string. AST allows for analysis of these tokens, in this case filtering on commands which are related to Exchange Online. If you want to get started on AST, check out this article, or plunge in the PowerShell SDK straightaway.
Final Words When every Exchange Online command discovered is found to be offering REST support, you can turn off Basic Authentication on the client, for example through GPO or by reconfiguring WinRM:
winrm set winrm/config/client/auth @{Basic="false"}
Only thing you might need to refactor is if and how the script connects to Exchange Online, as Basic Authentication allowed for connecting to Exchange Online using (stored) credentials for example. Examples on how to use more secure Modern Authentication-based methods to connect can be found in an earlier article here.
A short blog on something which I find still surprises admins and consultants working with Exchange Online Management module for Powershell. The Exchange Online Management v2 module has been offering support for REST for a while now. One of the benefits of using these REST-based cmdlets, apart from performance and resilience, is that it uses Modern Authentication to connect to Exchange Online, which is the way forward, as Basic Authentication gets directed to the exit.
Now the initial versions of the module supported a limited set of 9 cmdlets. The REST cmdlets used the EXO prefix, such as Get-EXOMailbox as counterpart of Get-Mailbox. I wrote an earlier blog about using EXOv2, configuring the app in Azure and alternative ways to authenticate here.
Per version 2.0.6, which is still in preview, around 250 additional cmdlets got REST support as well, but using their original name and parameter set. You can check the number of cmdlets available after connecting, e.g.
As you can see above, after connecting this version supports 397 cmdlets for my role in addition to the 31 available pre-connecting. Your exact number might vary, based on the roles assigned to your account.
The confusion usually starts when people enter commands or run scripts, and find cmdlets are “missing”. Often they find that the Set/New cmdlet is unavailable, while the Get is available, e.g.
Before, this could be an indication those commands were removed from the role assigned to you, such as the New-MailboxImportRequest cmdlet which only is available if you have mailbox import/export assigned. But in this situation, it could be that the cmdlet does not have a REST call (yet). In those cases, you need to connect using a regular Remote PowerShell session, by specifying -UseRPSSession:
When connecting this way, I have 739 cmdlets at my disposal, including the ones which do not support REST. Note that cmdlets which support REST still will use REST; the commands that require Remote PowerShell will use the imported cmdlet. As a reminder, Remote Powershell requires Basic Authentication, and therefor must be enabled on the system you are connecting from.
Tip: Did you know you can view the release notes of the installed Exchange Online Management module by inspecting the ReleaseNotes property, e.g.
Update 22feb2021: Added note about enabling SMTP Authentication.
Not too long ago, the Exchange product group enabled Modern Authentication (or OAuth2) support for IMAP and SMTP in Exchange Online, and shortly after for POP3 as well. This support was much needed with the imminent deactivation of Basic Authentication. With Modern Authentication available, vendors, developers as well as organizations running custom scripts are given time to adopt Modern Authentication where applicable.
By delaying the original end date of Basic Authentication from October 13, 2020 to Q3’ish 2021 due to the Corona situation, the adoption period is increased significantly. That does not mean however developers and organizations can sit back and relax: Act sooner rather than later, the end of Basic Authentication is nigh.
The benefits of Modern Authentication are of course that it is a more secure model (e.g. resistant to password spray attacks), as well that it can leverage Microsoft 365 functionality like Conditional Access to limit protocols to certain locations.
That said, in this article I will show you how to approve usage of a popular 3rd party e-mail application Thunderbird, using IMAP protocol in conjunction with the Modern Authentication scheme. The procedures below have been run against Thunderbird 78.0b4 on Windows as well as Ubuntu.
Third Party Applications Before we move on to Thunderbird, we first make sure the organization settings allow for third party applications to access your mailbox Exchange Online. This process has been blogged about for common popular applications, such as the native iOS Mail app or the Gmail app on Android. So, how to go ahead if your organization restricts access to third party applications, and they only want to allow specific applications, which is of course good practice.
The easiest way to add Thunderbird to the allowed applications and grant consent to the organization, is by constructing an admin consent URL. To construct the consent URL, take the following URL:
Replace <TenantID> with your Tenant ID. This piece of information can be found under the Azure Active Directory blade in the Azure portal.
Replace <AppID> with the Application ID (sometimes also referred to as Client ID) of the application you want to provide consent for. As we can see in the table below, the ID of Thunderbird is 08162f7c-0fd2-4200-a84a-f25a4db0b584.
Application
ID
Thunderbird
08162f7c-0fd2-4200-a84a-f25a4db0b584
Gmail app
2cee05de-2b8f-45a2-8289-2a06ca32c4c8
iOS Accounts (Apple Mail app)
f8d98a96-0999-43f5-8af3-69971c7bb423
Open your browser, and visit this URL as an administrator. You will be greeted with a consent form, in which you will be asked to accept for your organization. Because the redirect_uri is empty here, you will likely be send to a non-existing location after giving consent, but that’s OK.
When you look at the Enterprise Applications blade in the Azure Portal, you will notice the Thunderbird app has been added. Here you can further customize it, like any enterprise application supporting Modern Authentication, e.g.
Restrict access to specific users or groups.
Use Conditional Access to restrict access to certain locations.
Another thing to note is that permissions for Thunderbird app will have been translated to the following Graph permissions:
API
Permission
Type
Microsoft Graph
Read and write access to mailboxes via IMAP.
Delegated
Microsoft Graph
Read and write access to mailboxes via POP.
Delegated
Microsoft Graph
Read and write access to mailboxes via SMTP AUTH.
Delegated
Microsoft Graph
Sign in and read user profile.
Delegated
We should now be ready on the back-end.
Thunderbird Now as an end user, start Thunderbird. Do not start configuring the account yet, as we first need to modify a Thunderbird setting to allow for successful Modern Authentication through a browser popup. Click the ‘hamburger’ menu to open the Options window. Scroll all the way down, and open the Config Editor. Click ‘I Accept the risk’. In the settings overview, set General.UserAgent.CompatMode.Firefox setting to True:
Preference Name
Status
Type
Value
general.useragent.compatMode.firefox
modified
boolean
True
Close the Config Editor and Preferences tab. We can now set up our account in Thunderbird.
Select Add Mail Account, and enter your name and e-mail address. You can leave the password empty, as we will be using an Oauth token which we will retrieve later on. Press Continue to have Thunderbird figure out where your mailbox is hosted. When it properly discovers the mailbox location, it will set the configuration as follows:
If Thunderbird can’t figure out your settings (for some reason the Windows build could, but the Ubuntu build couldn’t), configure them as indicated above. We can’t select OAuth2 for authentication here, so leave Authentication as is; we will correct this right after we click Done.
Note: Configure manually would be the place you expect to set authentication to OAuth2 straight away, but with the build we used, the OAuth2 option is not available from the manual account setup dialog. Therefore, we need to set up the account and correct settings afterwards.
In the Server Settings window related to your account, select OAuth2 authentication:
In the Outgoing Server (SMTP) settings, select Offic365 (Microsoft) – smtp.office365.com, click Edit and set authentication for outbound SMTP to OAuth2 as well. Note: The Thunderbird build running on Ubuntu doesn’t provide the OAuth2 authentication option for SMTP.
When finished, click ‘Get Messages’. The familiar Microsoft 365 authentication browser dialog should show up. After signing in, the next question will be to grant consent to the Thunderbird application to it can access your mailbox data and send e-mail:
Note that this dialog can not be suppressed, as currently only interactive applications are supported. If you are working on an app or script which needs unattended access, please use Graph API.
After the user provides consent, Thunderbird is ready and will start fetching your default folders and mail items. If you want to view additional folders, you need to subscribe to them by right-clicking the account and picking Subscribe. Only folders with mail-items are supported, despite you can select every folder in your mailbox including Calendar or Contacts.
Note: If you encounter problems sending messages, please check the CASMailbox setting SmtpClientAuthenticationDisabled. If it is set to $true, you need to disable it to enable SMTP authentication, e.g.
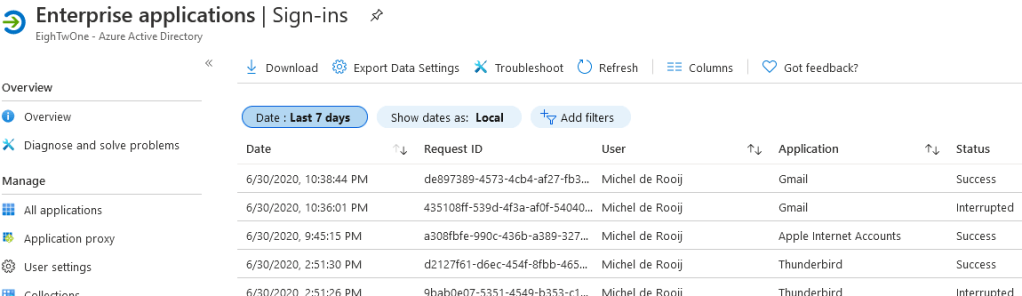
Logging If you have people in your organization requiring some form of proof that Modern Authentication is being used, you can use the Enterprise Applications / Sign-Ins view from the Azure Active Directory portal.
Alternatively, you can use Thunderbird’s built-in logging capabilities. To accomplish the latter, set the following environment variables before starting Thunderbird:
With the speed of development in Office 365, it is sometimes hard to track which changes have been made to your tenant. Of course, there is the roadmap and message board which you can use to keep up to date, but those are in general high level descriptions. Sometimes you may want to see what are the changes at the cmdlet level in your tenant, between tenants, or Azure Active Directory module. And there is also the occasional gem in the form of a yet undocumented cmdlet or parameter which could hint at upcoming features.
For this purpose I have created a simple script which has two purposes:
Export information on the current cmdlets available through Exchange Online or Azure Active Directory.
Compare two sets of exported information, and display changes in a readable way.
The script is in PowerShell (of course), and is called Compare-Cmdlets.ps1. To export information, you need to be already connected to either Exchange Online or Azure Active Directory (or both).
To export cmdlet information, use:
.\Compare-Cmdlets.ps1 –Export
For Exchange Online and Azure Active Directory, separate export files are created. The files are prefixed with a timestamp and postfixed with the Exchange Online build or Azure Active Directory module version, e.g. 201803121814-ExchangeOnline-15.20.548.21.xml or 201803121815-AzureAD-2.0.0.137.xml.
After a few days/week, or when connected to another tenant or using a new Azure Active Directory PowerShell module, run the export again. You will now have 2 sets of Exchange Online or Azure Active Directory cmdlets, which you can compare using the following sample syntax:
A progress bar is shown as comparison might take a minute. When the script has finished checking the two sets, you will see output indicating changes in cmdlets, parameters or switches, e.g.


![clip_image001[14]](https://eightwone.com/wp-content/uploads/2020/07/clip_image00114.png "clip_image001[14]")

![clip_image001[18]](https://eightwone.com/wp-content/uploads/2020/07/clip_image00118.png "clip_image001[18]")